Connect with us

Recipes & Culinary Uses

Make Your Own Creamy Hazelnut Butter in 7 Easy Steps

Published

on

An image showcasing the step-by-step process of making homemade hazelnut butter: a pile of roasted hazelnuts, a food processor in action, silky smooth butter being scraped into a jar, and a spoonful of luscious hazelnut butter ready to be savored

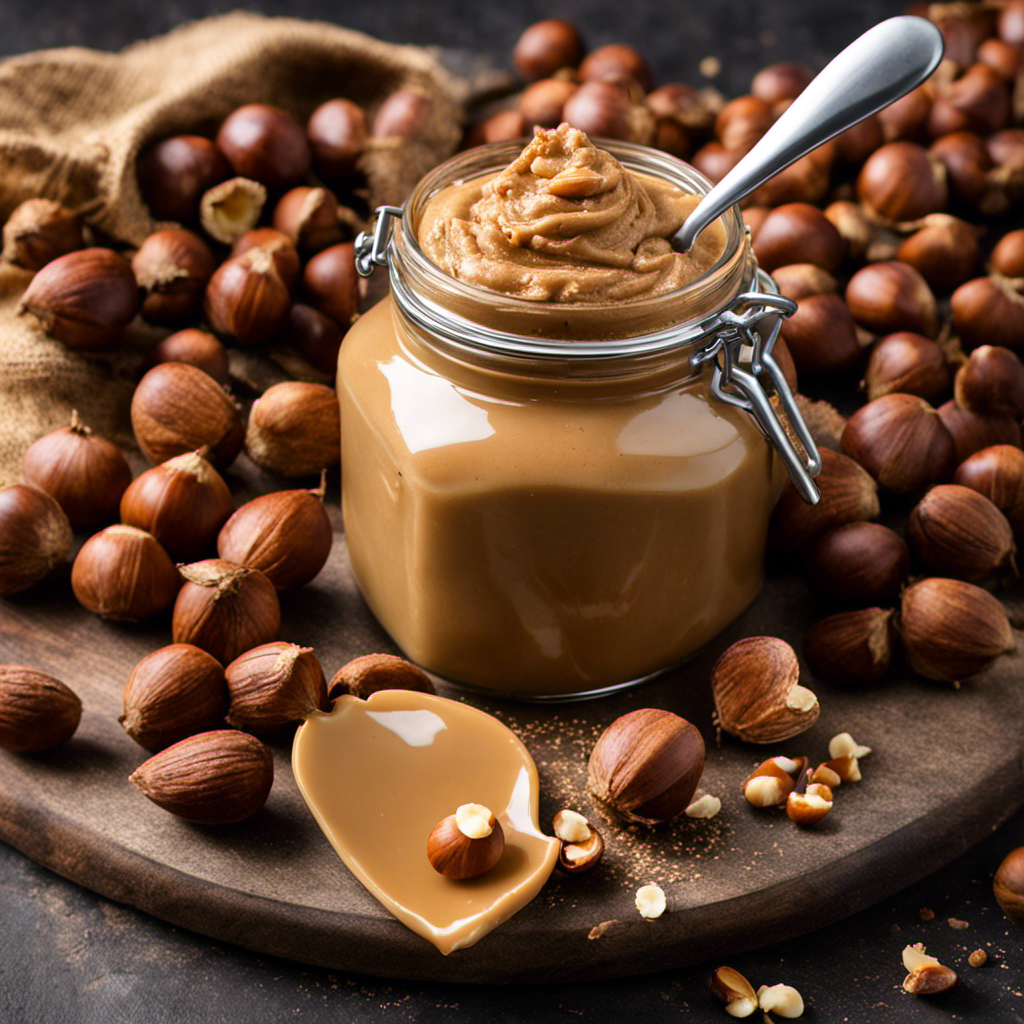
I really enjoy the decadent and smooth flavor of homemade hazelnut butter. It’s so satisfying to make this tasty spread from scratch.

In this article, I’ll show you step-by-step how to make hazelnut butter that is bursting with flavor. From selecting the perfect hazelnuts to adding your own unique twist, I’ll guide you through the entire process.

Get ready to experience the sheer joy of spreading homemade hazelnut butter on warm toast or using it in your favorite recipes.

Key Takeaways

  • Select high-quality hazelnuts for the best flavor and texture
  • Remove the hazelnut skins for a smoother and creamier consistency
  • Grind the roasted hazelnuts in small batches using a high-speed blender or food processor
  • Experiment with flavoring options and blending techniques to achieve the desired taste and texture

Selecting the Right Hazelnuts

You should start by picking out the freshest hazelnuts for your butter. When selecting hazelnuts, it’s important to choose high-quality ones to ensure the best flavor and texture in your homemade hazelnut butter. Look for hazelnuts that are plump, firm, and have a smooth outer shell. Avoid any nuts that appear discolored or have a rancid smell.

Advertisement

If you’re unsure about what brand of hazelnuts to buy, there are several reputable hazelnut butter brands available in the market. Some popular options include Justin’s, Barney Butter, and Nutella. These brands offer a range of flavors and textures to suit different preferences.

Aside from their delicious taste, hazelnuts also provide numerous nutritional benefits. They are packed with healthy fats, fiber, vitamins, and minerals. Hazelnuts are known to support heart health, improve digestion, and boost brain function. They are also a rich source of antioxidants, which help fight inflammation and protect against chronic diseases.

Roasting the Hazelnuts

When it comes to roasting hazelnuts, the duration of the process and the temperature at which they are roasted play crucial roles in achieving the perfect flavor and texture.

The roasting process duration can vary depending on personal preference, but typically ranges from 10 to 15 minutes.

As for the best temperature, a temperature of 350°F (175°C) is often recommended as it allows the hazelnuts to roast evenly without burning.

Advertisement

Roasting Process Duration

The roasting process for hazelnuts should typically last between 10 to 15 minutes. This duration ensures that the nuts are perfectly roasted, bringing out their rich flavor and aroma. However, it’s important to note that the exact roasting time may vary depending on factors such as the size of the nuts and the desired level of roastiness.

To achieve the best results, here are some key points to consider:

  • Watch the color: Hazelnuts should turn a golden brown color when roasted. Keep a close eye on them to prevent over-roasting, which can lead to a burnt taste.

  • Use a preheated oven: Make sure your oven is preheated to the recommended temperature before roasting the nuts. This ensures even heat distribution and consistent results.

  • Stir occasionally: To ensure even roasting, stir the hazelnuts every few minutes during the roasting process. This helps to prevent any hot spots and ensures that all nuts are evenly roasted.

Best Temperature for Roasting?

To achieve perfectly roasted hazelnuts, it’s best to roast them at a temperature of 350°F. This temperature ensures that the nuts are evenly roasted, creating a deliciously nutty flavor and a satisfying crunch. The roasting process is a crucial step in making hazelnut butter as it enhances the natural oils and releases a rich aroma. The impact of roasting temperature on the final product cannot be overstated. Roasting at too low a temperature can result in under-roasted nuts with a raw taste, while roasting at too high a temperature can lead to burnt and bitter flavors. Finding the perfect balance is key. To help you understand the impact of different roasting temperatures, here’s a table showcasing the results:

Roasting Temperature (°F) Roasting Time (minutes) Result
325°F 15 Lightly roasted with a mild flavor
350°F 12 Perfectly roasted with a rich nutty taste
375°F 10 Deeply roasted with a bold and robust flavor

Removing the Hazelnut Skins

Advertisement

When it comes to removing the skins from hazelnuts, there are a few methods that can be used.

One popular method is blanching the nuts in boiling water and then rubbing off the skins.

Another method involves roasting the nuts and then rubbing them together to remove the skins.

It is important to remove the skins from hazelnuts because they can add a bitter taste and a rough texture to the final product.

Skin Removal Methods

Start by roasting your hazelnuts to loosen the skins before removing them. There are different skin removal techniques you can use to achieve smooth and creamy hazelnut butter. Here are three methods to consider:

Advertisement
  • Blanched Hazelnuts: After roasting, transfer the nuts to a clean kitchen towel and wrap them tightly. Rub the towel against the nuts to remove the skins. The heat and friction will help loosen the skins, making them easier to remove.

  • Water Bath Method: Roast the hazelnuts and then place them in a bowl of warm water for a few minutes. Rub the nuts between your fingers or use a kitchen towel to remove the skins. The water will help soften the skins, making them easier to peel off.

  • Food Processor Method: Blend the roasted hazelnuts in a food processor until they turn into a paste. Transfer the paste to a clean kitchen towel and rub the towel against the paste to remove the skins. The texture of the paste will help remove the skins more easily.

While removing the skins can give hazelnut butter a smoother texture, leaving the skins on has its benefits. The skins contain fiber and add a slightly bitter flavor, enhancing the overall taste of the butter. However, it’s a matter of personal preference.

Importance of Removing Skins

Now that we’ve discussed various skin removal methods, let’s explore the importance of removing skins when making hazelnut butter.

Removing the skins from hazelnuts offers several benefits that enhance the overall taste and texture of the butter.

Firstly, removing the skins helps to create a smoother and creamier consistency. The skins can be slightly bitter and grainy, so by removing them, we eliminate any unpleasant flavors or textures. This results in a more enjoyable eating experience.

Additionally, removing the skins improves the overall color of the hazelnut butter. The skins can give the butter a darker appearance, whereas without them, the butter takes on a lighter and more appealing color.

Advertisement

Lastly, removing the skins can also extend the shelf life of the hazelnut butter. The skins contain natural oils that can turn rancid over time, leading to a shorter storage life. By removing the skins, we increase the longevity of the butter.

Grinding the Roasted Hazelnuts

After roasting the hazelnuts, you can begin grinding them to make hazelnut butter. Grinding the roasted hazelnuts is a crucial step in the process as it helps release the oils and create a smooth and creamy texture.

Here are some tips to ensure you achieve the best results:

  • Use a high-speed blender or a food processor to grind the hazelnuts.
  • Start with small batches to ensure even grinding and prevent the motor from overheating.
  • Pulse the machine in short bursts to avoid overheating and allow the nuts to release their oils gradually.

Once the hazelnuts are ground to your desired consistency, you can add flavoring options such as vanilla extract, cocoa powder, or even a pinch of salt to enhance the taste. Remember to scrape down the sides of the blender or processor occasionally to ensure an even blend.

Grinding the hazelnuts is the next exciting step towards creating your homemade hazelnut butter!

Adding Flavoring Options

When it comes to enhancing hazelnut butter, there are endless possibilities for creative flavor combinations. From sweet to savory, the addition of different ingredients can take your hazelnut butter to the next level.

Advertisement

In this discussion, we will explore various flavoring options and techniques that can elevate the taste of your homemade hazelnut butter.

Creative Flavor Combinations

To create unique and delicious flavor combinations for your hazelnut butter, you can experiment with adding ingredients like cocoa powder or cinnamon. These flavor pairings will take your hazelnut butter to a whole new level of deliciousness.

Here are three creative ideas to get you started:

  • Sea Salt and Dark Chocolate: Add a pinch of sea salt and some melted dark chocolate to your hazelnut butter for a sweet and savory combination that will satisfy any chocolate lover’s cravings.

  • Vanilla Bean and Maple Syrup: Scrape the seeds from a vanilla bean and mix them with a drizzle of maple syrup into your hazelnut butter. The result is a subtly sweet and aromatic spread that is perfect for breakfast or dessert.

  • Espresso and Almond Extract: Add a shot of espresso and a few drops of almond extract to your hazelnut butter for a rich and nutty flavor that pairs perfectly with toast or pancakes.

With these unique spreads, your hazelnut butter will never be boring again. Get creative and enjoy the delicious possibilities!

Enhancing Hazelnut Butter

When it comes to enhancing the flavor of hazelnut butter, there are numerous flavoring alternatives and unique recipe ideas that can take this creamy spread to a whole new level. By incorporating different ingredients and spices, you can create a variety of delicious and exciting flavors. Here are some ideas to inspire your hazelnut butter creations:

Advertisement
Flavoring Alternatives Unique Recipe Ideas
Cocoa Powder Hazelnut Mocha Butter
Cinnamon Spiced Hazelnut Butter
Vanilla Extract Vanilla Hazelnut Butter
Maple Syrup Maple Cinnamon Hazelnut Butter

These flavoring alternatives can be mixed into the hazelnut butter to create a unique and tasty spread. Whether you prefer a hint of cocoa, a warm touch of cinnamon, or the sweetness of maple syrup, there are endless possibilities to explore. So get creative and start experimenting with different flavors to elevate your hazelnut butter to new heights of deliciousness.

Blending the Hazelnut Mixture

After roasting the hazelnuts, blend them in a food processor until smooth and creamy. Blending the hazelnut mixture is a crucial step in creating delicious hazelnut butter.

Here are some key blending techniques and tips to troubleshoot common blending issues:

  • Pulse and scrape: Start by pulsing the hazelnuts in short bursts to break them down. Then, scrape down the sides of the food processor to ensure even blending.

  • Add oil if needed: If the mixture seems too dry or isn’t blending well, add a small amount of oil (such as hazelnut or vegetable oil) to help smooth out the butter.

  • Patience is key: Blending hazelnuts can take time, so be patient and blend in intervals, giving the processor a break to prevent overheating.

Adjusting the Consistency of the Hazelnut Butter

If your hazelnut mixture is too thick, you can adjust the consistency by gradually adding small amounts of oil. This will help make your hazelnut butter smoother and easier to spread.

Start by adding a teaspoon of oil at a time and blend it well until you achieve the desired texture. You can use any type of oil that you prefer, such as vegetable oil or coconut oil.

Advertisement

Additionally, if you want to add some sweetness to your hazelnut butter, you can incorporate sweeteners like honey, maple syrup, or even a pinch of sugar. Just be sure to add them gradually, tasting as you go, to avoid making the butter too sweet.

Adjusting the consistency and sweetness of your hazelnut butter will ensure that it is perfect for your taste buds.

Storing and Preserving Hazelnut Butter

To keep your hazelnut spread fresh, store it in an airtight container in the refrigerator. This will help preserve its flavor and prevent it from spoiling too quickly.

Here are some important techniques to ensure the longest possible shelf life for your homemade hazelnut butter:

  • Use a clean and dry spoon every time you scoop out the spread to avoid introducing moisture or contaminants.
  • Avoid exposing the hazelnut butter to direct sunlight or heat, as this can cause it to go rancid faster.
  • Consider portioning the hazelnut butter into smaller containers to minimize air exposure each time you open the main jar.

Using Hazelnut Butter in Recipes

You can incorporate hazelnut spread into your favorite recipes for a delicious and nutty flavor. Adding hazelnut butter to baked goods is a fantastic way to elevate your treats. Whether it’s spreading it on toast, swirling it into brownie batter, or using it as a filling for cookies, the rich and creamy hazelnut flavor will add a delightful twist to your desserts.

But don’t limit yourself to just sweet treats! Incorporating hazelnut butter into savory dishes can also be a game-changer. It can be used as a base for sauces or marinades, giving them a unique and nutty taste. Imagine drizzling hazelnut butter over roasted vegetables or blending it into a creamy soup. The possibilities are endless!

Advertisement

Now, let’s explore the health benefits of hazelnut butter.

Health Benefits of Hazelnut Butter

Incorporating hazelnut spread into your diet can provide numerous health benefits. Here are three key reasons why incorporating hazelnut butter into a healthy diet is a great idea:

  • Rich in healthy fats: Hazelnuts are packed with monounsaturated fats, which support heart health and lower bad cholesterol levels.

  • Nutrient powerhouse: Hazelnuts contain essential nutrients like vitamin E, magnesium, and copper. These nutrients play a crucial role in maintaining overall health and well-being.

  • Digestive health support: Hazelnuts are a good source of dietary fiber, which aids in digestion and helps prevent constipation.

By incorporating hazelnut butter into your diet, you can enjoy these health benefits while adding a delicious and versatile ingredient to your meals.

Now, let’s move on to some tips and tricks for making the perfect hazelnut butter.

Tips and Tricks for Making the Perfect Hazelnut Butter

For the perfect hazelnut spread, start by roasting the nuts until they become fragrant and golden brown. This process intensifies their flavor and makes them easier to blend into a smooth butter.

Advertisement

Once roasted, let the nuts cool slightly before transferring them to a food processor or high-powered blender. Blend the nuts on high, scraping down the sides as needed, until they turn into a creamy butter.

If the consistency is too thick, you can add a small amount of oil, such as coconut or avocado, to achieve a smoother texture. On the other hand, if the butter is too runny, try adding a tablespoon of chia seeds or flaxseed meal and blending again until desired consistency is reached.

These alternatives can help troubleshoot and adjust the consistency of your homemade hazelnut butter.

Frequently Asked Questions

How Long Does It Take to Roast the Hazelnuts?

Roasting time for hazelnuts can vary depending on the desired level of flavor and crunchiness. It usually takes around 10-15 minutes in a preheated oven at 350°F. However, alternative roasting methods like stovetop or air frying can be quicker.

Can I Use Any Type of Hazelnuts to Make Hazelnut Butter?

Yes, you can use any type of hazelnuts to make hazelnut butter. However, some varieties may have a stronger or milder flavor. Experiment with different types to find your favorite. Enjoy homemade hazelnut butter on toast, in smoothies, or as a dip for fruits and veggies.

Advertisement

How Do I Know When the Hazelnut Skins Are Fully Removed?

When the hazelnut skins are fully removed, they should appear smooth and brown. Substituting almonds or cashews can yield different variations of nut butter. Experiment with roasting or adding flavors like chocolate for unique hazelnut butter variations.

Can I Add More Than One Flavoring Option to My Hazelnut Butter?

Yes, you can definitely add multiple flavorings to your hazelnut butter. Experiment with different flavor combinations like cinnamon and vanilla, or try alternative nut options like almonds or cashews for added variety.

How Long Can I Store Homemade Hazelnut Butter For?

I can store homemade hazelnut butter for up to six months. To maintain its freshness, it’s important to store it in an airtight container and keep it in the refrigerator.

Conclusion

In conclusion, making homemade hazelnut butter is a delightful and rewarding experience. By carefully selecting and roasting the hazelnuts, removing their skins, and grinding them to a smooth consistency, you can create a rich and flavorful spread.

Adding your favorite flavorings, such as honey or cinnamon, will enhance the taste even further. Remember to store your hazelnut butter properly to maintain its freshness and enjoy its health benefits.

Advertisement

As the saying goes, "Homemade is always better," so why not give it a try and savor the deliciousness of your very own hazelnut butter creation?

Continue Reading
Advertisement

Recipes & Culinary Uses

Creamy Delight: Best Butter Pecan Ice Cream Recipe for Summer!

Yearning for a creamy summer treat that will leave you craving more?

Published

on

By

butter pecan ice cream

Savor a delicious summer treat with our Butter Pecan Ice Cream recipe. Mix butter, brown sugar, cream, and pecans for a creamy delight. Melt butter, cook pecans, whisk eggs, and blend for a rich flavor. Add pecans, cream, and vanilla, then freeze to perfection. Master this easy-to-follow recipe for a tasty dessert to beat the heat.

Key Takeaways

  • Rich and creamy blend of butter, brown sugar, and heavy cream
  • Toasted pecans for a nutty crunch and flavor
  • Easy-to-follow steps for homemade ice cream perfection
  • Customization options with variations like bourbon or chocolate
  • Perfect summer treat with a decadent, refreshing taste

Recipe Ingredients for Butter Pecan Ice Cream

To create a delectable batch of butter pecan ice cream, gather the essential ingredients listed in the recipe.

You'll need:

  • Butter
  • Brown sugar
  • Heavy cream
  • Pecans

These ingredients combine to bring out the rich and nutty flavors of this classic dessert.

The brown sugar adds a caramel-like sweetness, while the heavy cream contributes to a creamy texture that's essential for a decadent treat.

Pecans, when toasted in butter, provide a delightful crunch and enhance the overall flavor profile of the ice cream.

Cooking Instructions for Homemade Ice Cream

making ice cream at home

Start by melting butter in a skillet to infuse the pecans with a rich, nutty flavor for your homemade butter pecan ice cream.

Here's a quick guide to help you make this creamy delight:

Advertisement
  • Melt butter and cook pecans for flavor.
  • Whisk eggs and combine with half-and-half and brown sugar for a creamy base.
  • Cook until thickened, then mix with eggs in a bowl.
  • Add cream, pecans, and vanilla extract.
  • Freeze the mixture in an ice cream maker.

Following these steps will guarantee your homemade butter pecan ice cream turns out rich and delicious.

Remember to carefully adhere to the manufacturer's instructions for your ice cream maker to achieve the perfect consistency.

Enjoy the process of creating this delightful treat that will surely be a hit during the summer months.

Ice Cream Preparation Steps

ice cream recipe instructions

Mix half and half with brown sugar over medium heat in a large bowl to prepare the ice cream base.

Next, whisk beaten eggs and temper them with the warm milk mixture to create a smooth custard.

Once done, thicken the mixture on low heat, then cool it over an ice bath to achieve ideal texture.

After that, stir in heavy cream, vanilla extract, maple extract, and a pinch of salt for rich flavor.

Advertisement

Remember to refrigerate the mixture for 1 1/2 – 2 hours before churning it into creamy butter pecan ice cream.

This process ensures that the flavors meld together beautifully and the ice cream attains the perfect consistency for scooping and savoring.

Nutritional Information and Tips

healthy eating guidance provided

Considering the rich and creamy nature of homemade butter pecan ice cream, it's important to be mindful of its nutritional content and serving size. When indulging in this delectable dessert, remember these essential tips:

  • Portion Control: Enjoy in moderation to savor the flavors without overindulging.
  • Brown Sugar Sweetness: Opt for a moderate amount of brown sugar to balance sweetness without overwhelming the palate.
  • Room Temperature Ingredients: Confirm ingredients like butter and heavy cream are at room temperature for a smoother texture.
  • Nutritional Awareness: Be mindful that homemade butter pecan ice cream can vary in nutritional content, so adjust ingredients accordingly.
  • Consultation: Seek advice from a nutritionist or healthcare provider for personalized guidance on incorporating this treat into a balanced diet.

Homemade Butter Pecan Ice Cream Variations

delicious homemade ice cream

Explore creative twists on traditional butter pecan ice cream by incorporating different nuts, spirits, sauces, chocolates, and dairy-free alternatives.

For a unique flavor, try substituting pecans with walnuts or almonds in the full recipe. Toast the nuts in a separate bowl until browned and fragrant, then chop them finely enough to coat in the ice cream mixture.

To add a boozy kick, mix in a splash of bourbon or rum to the base as you churn the ice cream. For an extra indulgent touch, swirl in caramel sauce or fudge ripple throughout the mixture.

Incorporate chunks of chocolate or chocolate-covered nuts for a delightful contrast in texture, giving each bite a sweet surprise.

Advertisement

If you prefer a lighter, dairy-free option, consider using coconut milk or almond milk as a substitute for traditional dairy products. These alternatives provide a creamy base while catering to plant-based diets.

Experiment with these variations to create a personalized butter pecan ice cream that suits your taste preferences.

Frequently Asked Questions

What Is the Secret to Making Ice Cream Very Creamy?

To make ice cream very creamy, you use a rich base of ingredients like heavy cream, eggs, and sugar. Chilling the base before churning is crucial for a smoother texture. Adding vanilla extract enhances creaminess, and slow churning prevents a dense outcome.

What Flavor Is the Ice Cream in Butter Pecan?

The ice cream in butter pecan is a delightful blend of buttery richness, vanilla sweetness, and maple undertones, perfectly paired with toasted pecans for a nutty crunch. This flavor combination creates a harmonious and indulgent treat.

What's the Difference Between Butter Pecan Ice Cream and Praline Pecan Ice Cream?

In butter pecan ice cream, you'll savor the buttery richness of pecans blended with a creamy base. On the other hand, praline pecan ice cream highlights caramelized sweetness with a swirl of praline sauce for a delightful flavor contrast.

Advertisement

What Age Group Eats Butter Pecan Ice Cream?

You'll find that adults and older individuals, typically in the 30-60 age group, enjoy butter pecan ice cream. It's a favorite among those with a more refined palate, drawn to its rich and nutty flavor.

Conclusion

So there you have it, folks! Whip up this buttery, nutty delight for a taste of summer in every scoop.

Don't cry over spilled milk – grab a cone and enjoy this creamy treat that's sure to satisfy your sweet tooth.

Get churning and indulge in the best butter pecan ice cream you've ever tasted!

Advertisement
Continue Reading

Recipes & Culinary Uses

Festive Favorites: Best Peanut Butter Blossoms Recipe for Holidays!

Unleash the ultimate holiday baking magic with the best Peanut Butter Blossoms recipe – an irresistible treat that will elevate your festive celebrations!

Published

on

By

holiday baking with flair

Elevate your holiday baking with the ultimate Peanut Butter Blossoms recipe. Cream together peanut butter, butter, sugars, and salt, then add egg and vanilla. Roll dough into balls, coat in brown sugar, bake until golden, then press a Hershey's kiss on top. Adjust baking time as needed. Explore ingredient swaps for a personalized touch. Enjoy with hot cocoa or pair with savory dishes. For more tips, ideas, and customization options, the recipe holds more festive surprises.

Key Takeaways

  • Cream together peanut butter, butter, sugars for rich flavor.
  • Bake at 375°F for 8-10 minutes for soft, chewy cookies.
  • Customize with ingredient swaps like almond butter or maple syrup.
  • Pair with savory dishes or hot cocoa for holiday enjoyment.
  • Press Hershey kisses onto warm cookies for a classic finish.

Ingredients for Peanut Butter Blossoms

For the classic Peanut Butter Blossoms recipe, gather peanut butter, butter, sugar, an egg, and Hershey's kisses as your essential ingredients.

Peanut butter is the star, offering a rich flavor that blends perfectly with the sweetness of the cookies.

Butter plays a pivotal role by adding moisture and richness to the dough, ensuring a soft and chewy texture.

The sugar not only sweetens the cookies but also contributes to their festive appeal, making them a perfect treat for any occasion.

Finally, the Hershey's kisses on top provide a delightful chocolatey finish that elevates these cookies to a whole new level of deliciousness.

Advertisement

Together, these ingredients create a harmonious blend of flavors and textures that make Peanut Butter Blossoms a beloved classic for holiday baking or any time you crave a sweet and satisfying treat.

Recipe Steps for Peanut Butter Blossoms

bake peanut butter cookies

To make Peanut Butter Blossoms, start by creaming together peanut butter, butter, sugars, and salt until light and fluffy.

Next, add in the egg and vanilla extract, making sure to mix well to combine all the ingredients thoroughly.

Then, gradually incorporate the dry ingredients into the wet mixture until a smooth dough forms.

Once the dough is ready, roll it into balls and coat each ball generously in brown sugar.

Place the sugar-coated dough balls on a baking sheet, making sure to leave enough space between them for spreading during baking.

Advertisement

Bake the cookies in a preheated oven until they turn a beautiful golden brown.

As soon as the cookies are out of the oven, press a Hershey's kiss into the center of each cookie gently.

The heat from the freshly baked cookies will melt the chocolate just enough to adhere it to the cookie.

These Peanut Butter Blossoms are a delightful treat perfect for Christmas celebrations!

Pro Tips for Making Peanut Butter Blossoms

baking perfect peanut blossoms

To enhance your peanut butter blossom baking experience, consider adjusting the baking time based on your oven's performance for best results.

Additionally, explore ingredient substitutions to cater to dietary preferences or allergies without compromising the flavor or texture of the cookies.

Advertisement

These pro tips can help you customize your peanut butter blossoms while ensuring delicious outcomes.

Baking Time Recommendations

Achieving the ideal texture for your peanut butter blossoms involves baking them at 375°F for 8-10 minutes. This baking duration guarantees that the cookies have a soft and chewy consistency while allowing the Hershey kisses on top to be softened but not completely melted.

Once out of the oven, remember to press the Hershey kisses onto the cookies immediately to secure them in place for that classic appearance.

For the best outcomes, chill the cookie dough for about 30 minutes before baking. This step helps the cookies maintain their shape and prevents excessive spreading during baking, ensuring your peanut butter blossom cookies are perfectly formed and ready to impress during your holiday baking.

Shortening or extending the baking time can alter the texture of the cookies. A quick bake of 6-8 minutes produces softer and chewier cookies, while longer baking times yield a slightly crispier consistency. Stick to the recommended 8-10 minutes for the best soft and chewy peanut butter blossoms.

Advertisement

Ingredient Substitutions

Consider incorporating different ingredients to elevate the flavor and nutritional profile of your peanut butter blossoms. For a healthier option, swap out shortening with unsalted butter to achieve a unique texture and taste in your cookies.

Try using natural peanut butter instead of creamy to add a wholesome twist to the classic recipe. If you're looking to reduce the glycemic impact, substitute brown sugar with coconut sugar in your baking. For a natural sweetener alternative, replace regular granulated sugar with maple syrup in the cookie dough mixture.

Additionally, for a distinct flavor experience, experiment with almond butter as a substitute for peanut butter in your blossoms. These ingredient substitutions can bring a new dimension to your peanut butter blossoms, making them not only delicious but also tailored to your dietary preferences.

Upgrade your baking game this holiday season with these creative twists on a beloved recipe!

Serving Suggestions for Peanut Butter Blossoms

peanut butter cookie recipe

Enhance the enjoyment of your peanut butter blossoms by pairing them with savory dishes like lasagna tortellini soup for a satisfying meal. These classic cookies also complement family-friendly dinners such as easy ground beef shepherd's pie and creamy broccoli cheddar soup, making for a delightful combination. The holiday season calls for cozy treats, and the sweet nuttiness of peanut butter blossoms pairs perfectly with a warm cup of hot cocoa. Whether you're participating in a cookie exchange or looking for a festive touch to your holiday dessert spread, consider rolling the cookies in red, green, and white sugar sprinkles to add a pop of color and fun.

Serving Suggestions Pairing Ideas
Lasagna Tortellini Soup Comforting and hearty meal alongside the cookies
Easy Ground Beef Shepherd's Pie Delicious combination for a family dinner
Creamy Broccoli Cheddar Soup Perfect accompaniment to the nutty cookie flavors

12 Days of Christmas Cookies Recipes

baking traditions for the holidays

Indulge in a variety of delightful Christmas cookie recipes each day during the holiday season. One standout choice is the classic Peanut Butter Blossoms. These holiday cookies feature a peanut butter base topped with a Hershey's kiss, making them a beloved treat for cookie exchanges and festive gatherings.

The process of making these cookies is simple yet rewarding. Start by rolling the dough balls in sugar before baking to add a sweet crunch to each bite. The combination of rich peanut butter flavor and the chocolatey goodness of the Hershey's kiss creates a perfect balance of sweetness.

Advertisement

When enjoying these Christmas cookies, consider pairing them with a glass of milk for a classic and satisfying treat.

Whether you're baking them for your family, a cookie exchange, or a holiday party, Peanut Butter Blossoms are sure to be a hit. Make each day of the holiday season a little sweeter with these delicious cookies.

User Engagement Features

user interaction enhancements

Let's talk about how user interaction features and personalization options enhance your experience with the Peanut Butter Blossoms recipe.

You can engage with others by leaving comments and sharing your results, creating a sense of community around this holiday treat.

Personalization options like name and email entry fields help tailor the experience to your preferences, making it more engaging and enjoyable.

User Interaction Features

Utilizing user engagement features on the website allows for increased participation and feedback from visitors. The comment section enables users to interact with each other and provide valuable feedback on the Peanut Butter Blossoms recipe or share their experiences with Hershey's kisses. By incorporating a reply option, users can engage in conversations, fostering a sense of community around baking these delightful peanut butter cookies.

Advertisement

Moreover, the inclusion of name and email fields not only allows for personalization but also facilitates communication between the website and its visitors. This data storage feature guarantees that users can conveniently access their information for future visits, enhancing their overall user experience.

These user engagement features play an essential role in creating an interactive platform where users can engage, provide feedback, and communicate effectively. Such interaction not only enriches the user experience but also encourages visitors to actively participate in the community surrounding the Peanut Butter Blossoms recipe.

Personalization Options

Enhance your website's user engagement by incorporating personalized options such as commenting, replying, and sharing feedback on the Peanut Butter Blossoms recipe. This level of user interaction not only fosters a sense of community building but also encourages customization and feedback. By allowing users to share their thoughts, results, and experiences with the festive favorites, you create a more engaging and interactive user experience. Additionally, providing users with the option to save their data for future visits and encouraging them to tag @preppykitchen and use #preppykitchen when trying the recipe further enhances their engagement.

Personalization Options Description Benefits
Commenting Users can leave comments on the Peanut Butter Blossoms recipe, sharing their thoughts and experiences. Fosters community building and user engagement.
Replying Users can reply to comments and engage in discussions with other users about the recipe. Encourages active participation and interaction.
Feedback Sharing Users can share feedback on the recipe, providing valuable insights for improvement. Enhances user experience and customization.

Additional Information

clarifying specific details provided

You may find it interesting to know more about the history of the Peanut Butter Blossoms recipe and its cultural significance during the holidays.

  • The Peanut Butter Blossoms recipe's popularity is backed by IRI MULO data, making it a sought-after choice for holiday baking.
  • Copyright for this beloved recipe belongs to The J.M. Smucker Company, a reputable name in the food industry known for quality products.
  • These delightful cookies aren't only perfect for serving at holiday parties but also make excellent gifts due to their festive appeal.

Frequently Asked Questions

Why Are My Peanut Butter Blossoms Dry?

If your peanut butter blossoms are dry, it could be due to using too much flour, overbaking, using natural peanut butter that requires stirring, or not enough butter/shortening. Guarantee precise measurements and follow the recipe closely to maintain moisture.

Why Did My Peanut Butter Blossoms Go Flat?

When making peanut butter blossoms, going flat happens due to overmixing, too much flour, insufficient chilling, or low oven temperature. Remember to avoid these pitfalls. Preheat the oven properly and follow the recipe for perfect blossoms!

What Is America's Favorite Christmas Cookie?

America's favorite Christmas cookie is Peanut Butter Blossoms. Loved for their peanut butter-chocolate combo and nostalgic Hershey's Kiss center, these easy-to-make treats are a holiday staple at parties and gatherings. They're a must-have during the festive season.

Advertisement

What Is Baskin Robbins Peanut Butter Blossom?

You asked about Baskin Robbins Peanut Butter Blossom. It's a delectable seasonal ice cream flavor featuring creamy peanut butter ice cream with a ribbon of more peanut butter and chocolate cookie pieces. Indulge in this festive treat!

Conclusion

Indulge in the warm, gooey goodness of these peanut butter blossoms this holiday season. With the perfect blend of creamy peanut butter and rich chocolate, these cookies are sure to bring joy to your festivities.

Picture yourself surrounded by loved ones, sharing laughter and memories as you enjoy these delicious treats. Let the aroma of freshly baked cookies fill your home and create a cozy, festive atmosphere.

Happy baking and happy holidays!

Advertisement
Continue Reading

Recipes & Culinary Uses

Bite-Sized Treats: Best Peanut Butter Ball Recipe You'll Love!

Adore these heavenly peanut butter balls with a delectable mix of smooth peanut butter, powdered sugar, and vanilla—perfect for indulging in bite-sized bliss!

Published

on

By

delicious peanut butter balls

You'll adore these easy and heavenly peanut butter balls. Mix smooth peanut butter, powdered sugar, and vanilla extract for a delectable dough. Roll into small balls and chill. Dip in melted chocolate, then refrigerate to set. Enhance the flavor with rum extract, nuts, or crushed pretzels. Get creative with colorful sprinkles and different chocolate coatings. Use quality chocolate coating and adjust mix consistency. Store them in the fridge or freezer. Enjoy these mouthwatering treats alone or at gatherings. More tips and delightful variations await!

Key Takeaways

  • Creamy peanut butter, powdered sugar, and vanilla create a smooth dough.
  • Incorporate nuts, rum extract, or pretzels for flavor and texture variety.
  • Use quality chocolate coating like candy melts for best results.
  • Chill peanut butter balls before dipping for easier handling.
  • Store in the fridge or freezer for convenient snacking and serving.

Ingredients and Preparation

To create irresistible peanut butter balls, gather creamy peanut butter, powdered sugar, and vanilla extract as your key ingredients.

Begin by mixing the peanut butter, butter, sugar, and vanilla until you have a smooth dough. Roll this mixture into small balls and chill them before dipping them in melted chocolate.

The type of chocolate you use, such as dark or milk chocolate, will enhance the flavor of your peanut butter balls. After dipping, make sure to refrigerate the balls until the chocolate sets for a perfect finish.

This process guarantees that each bite-sized treat isn't only visually appealing but also bursting with delicious peanut butter and chocolate flavors.

Variations and Enhancements

creative modifications and improvements

You can elevate the flavor of your peanut butter balls by incorporating unique ingredients like chopped nuts or rum extract.

Experiment with different chocolate coatings such as white almond bark or dark chocolate candy melts for a varied taste experience.

Advertisement

Get creative by adding finishing touches like colorful sprinkles to make your peanut butter balls visually appealing.

Flavorful Ingredient Additions

Enhance the flavor of your peanut butter balls by incorporating unique ingredient variations and enhancements. While the classic combination of peanut butter, powdered sugar, and butter creates a delicious dough for your treats, you can take it up a notch by adding flavorful ingredient additions.

Consider mixing in crushed pretzels for a salty crunch that complements the sweetness of the peanut butter. Chopped nuts like almonds or pecans can also add a delightful texture and nutty taste to your chocolate-covered peanut butter balls.

For a burst of fruity flavor, try incorporating dried cranberries or raisins into the dough. These additions not only provide a contrast in texture but also introduce a hint of sweetness that pairs well with the creamy peanut butter.

Another option is to include a sprinkle of cinnamon or a dash of vanilla extract to elevate the overall taste profile of your peanut butter balls. Experiment with these flavorful ingredient additions to create a unique and delectable twist on the classic treat.

Advertisement

Chocolate Coating Options

Experiment with different types of chocolate coatings – dark, white, or milk chocolate – to suit your preferences and elevate the flavor of your peanut butter balls.

When considering the chocolate coating for your crunchy peanut butter treats, here are some options to enhance your culinary creation:

  1. Choose Candy Melts or Almond Bark: Opt for candy melts or almond bark for a smooth and firm chocolate coating that sets well on your peanut butter balls.
  2. Avoid Chocolate Chips: Steer clear of using chocolate chips for coating, as they may contain stabilizers that hinder smooth melting, affecting the overall texture.
  3. Add Colored Sprinkles: For a festive touch, sprinkle colored sprinkles on top of the chocolate coating before it sets to add a pop of color and extra crunch to your peanut butter balls.

Experimenting with different chocolate coatings and techniques can take your peanut butter balls to the next level, ensuring a delightful and indulgent treat for any occasion.

Creative Finishing Touches

To elevate the flavor profile of your peanut butter balls, consider incorporating creative finishing touches through various enhancements and unique variations.

You can enhance the texture by adding chopped nuts or crispy rice cereal to the peanut butter mixture, providing a delightful crunch with every bite.

Experiment with different flavors by using almond extract or rum extract instead of vanilla for a twist on the traditional taste.

Advertisement

For a festive touch, roll the balls in crushed graham crackers, sprinkles, or a sprinkle of sea salt to add a pop of flavor.

Drizzle white chocolate over the dark, semi-sweet, or milk chocolate coating for a visually appealing contrast that will impress your guests.

If you enjoy a crunchy element, try coating the balls in crushed pretzels or toasted coconut before the chocolate sets.

These creative enhancements will take your peanut butter balls to the next level, making them a standout treat at any gathering.

Tools and Tips

crafting with precision

Consider using a 1 tablespoon cookie scoop for consistent sizing when preparing your peanut butter balls. This tool will help guarantee all your treats are uniform in size, making for a neat presentation and even cooking.

Here are some additional tools and tips to enhance your peanut butter ball-making experience:

Advertisement
  1. Invest in Quality Chocolate Coating: Opt for candy melts or almond bark for a smooth and firm chocolate coating on your peanut butter balls. These coatings melt easily and provide a professional finish to your treats.
  2. Adjust Peanut Butter Mixture Consistency: If your peanut butter mixture is too sticky or too dry, adjust the consistency by adding more peanut butter or powdered sugar. This will help you achieve the perfect texture for shaping your balls.
  3. Refrigerate Before Dipping: Prior to dipping your peanut butter balls in chocolate, chill them in the refrigerator. This step will make the balls firmer, making them easier to handle and coat without falling apart.

Storage and Serving Suggestions

great suggestion for storage

For best freshness and presentation of your peanut butter balls, follow these storage and serving suggestions.

To keep your peanut butter balls tasting delicious, store them properly. You can store them in an airtight container in the fridge for up to 1 week or in the freezer for up to 2 months. When freezing, remember to thaw the frozen peanut butter balls before serving by bringing them to room temperature. To prevent them from sticking together, separate the layers of peanut butter balls with wax paper.

Here is a helpful table summarizing the storage and serving suggestions:

Storage Serving Frozen
Airtight container Display on festive tray Thaw before serving
Fridge – 1 week Pair with hot cocoa Bring to room temp
Freezer – 2 months Enjoy at holiday gatherings
Separate with wax paper

Additional Peanut Butter Desserts

peanut butter dessert recipes

Explore a variety of delectable peanut butter desserts to satisfy your sweet cravings.

  1. Peanut Butter Blossom Cookies: Indulge in the classic combination of peanut butter cookies topped with a chocolate kiss for a delightful treat.
  2. Peanut Butter Chocolate Mug Cake: Whip up this easy-to-make single-serving dessert that combines the rich flavors of peanut butter and chocolate in a mug for a quick fix.
  3. Peanut Butter Overload Cookies: For those who can't get enough peanut butter, these cookies are loaded with peanut butter chips, chocolate chips, and chopped peanuts for an explosion of flavor in every bite.

These additional peanut butter desserts offer a diverse selection to cater to your cravings.

Whether you're in the mood for a classic treat like Peanut Butter Blossom Cookies, a quick fix with Peanut Butter Chocolate Mug Cake, or a flavor-packed experience with Peanut Butter Overload Cookies, there's something for every peanut butter lover.

Enjoy these easy-to-make delights whenever you need a sweet pick-me-up!

Recipe Instructions and Nutritional Information

cooking guidance and facts

To create these delectable Peanut Butter Balls, start by blending peanut butter, butter, sugar, and vanilla to form a dough. Roll the mixture into small balls and place them on a baking sheet lined with parchment paper. Chill the peanut butter balls in the refrigerator for about 30 minutes until firm.

Once chilled, melt chocolate in a heatproof bowl over simmering water or in the microwave. Dip each chilled peanut butter ball into the melted chocolate, ensuring they're evenly coated. Place the coated balls back on the parchment paper and let the chocolate set.

Advertisement

Each serving of these delightful treats contains approximately 114 calories.

Store the finished peanut butter balls in the fridge for up to 2 weeks or freeze them for up to 3 months.

Enjoy these decadent bite-sized snacks whenever you crave a sweet and nutty indulgence.

Frequently Asked Questions

Can I Use Chunky Peanut Butter Instead of Creamy for This Recipe?

Yes, you can use chunky peanut butter instead of creamy for this recipe. It will add a delightful texture and extra crunch to your peanut butter balls. Enjoy experimenting with different variations!

How Long Do Chocolate Covered Peanut Butter Balls Stay Fresh?

Like a sweet memory, chocolate-covered peanut butter balls stay fresh for up to two weeks when stored in an airtight container in the fridge. Indulge in these delectable treats within that time frame for best taste.

Advertisement

Can I Freeze the Peanut Butter Balls for Later Enjoyment?

Yes, you can freeze the peanut butter balls for later enjoyment. Simply place them in an airtight container or freezer bag. When ready to indulge, let them thaw in the fridge for a few hours.

What Type of Chocolate Is Best for Coating the Peanut Butter Balls?

For coating the peanut butter balls, semi-sweet or milk chocolate works best. They provide a delicious contrast to the creamy peanut butter filling. Simply melt the chocolate, dip the balls, and enjoy the sweet treat!

Can I Add Chopped Nuts or Sprinkles to the Peanut Butter Balls for Extra Flavor?

You can definitely add chopped nuts or sprinkles to the peanut butter balls for extra flavor. It's a great way to customize your treats and add a delightful crunch or colorful touch to each bite.

Conclusion

Indulge in these irresistible peanut butter balls that are sure to satisfy your sweet tooth cravings.

With just a few simple ingredients and easy-to-follow instructions, you can enjoy these bite-sized treats in no time.

Advertisement

So go ahead, treat yourself to a little taste of heaven and experience the perfect combination of creamy peanut butter and rich chocolate.

You won't be able to resist coming back for more!

Continue Reading

Trending