Connect with us

Recipes & Culinary Uses

How Much Weed Do U Put in Easy Butter Maker with 1 Stick?

Published

on

An image showcasing the Easy Butter Maker 1 Stick, filled with precisely measured, finely ground cannabis

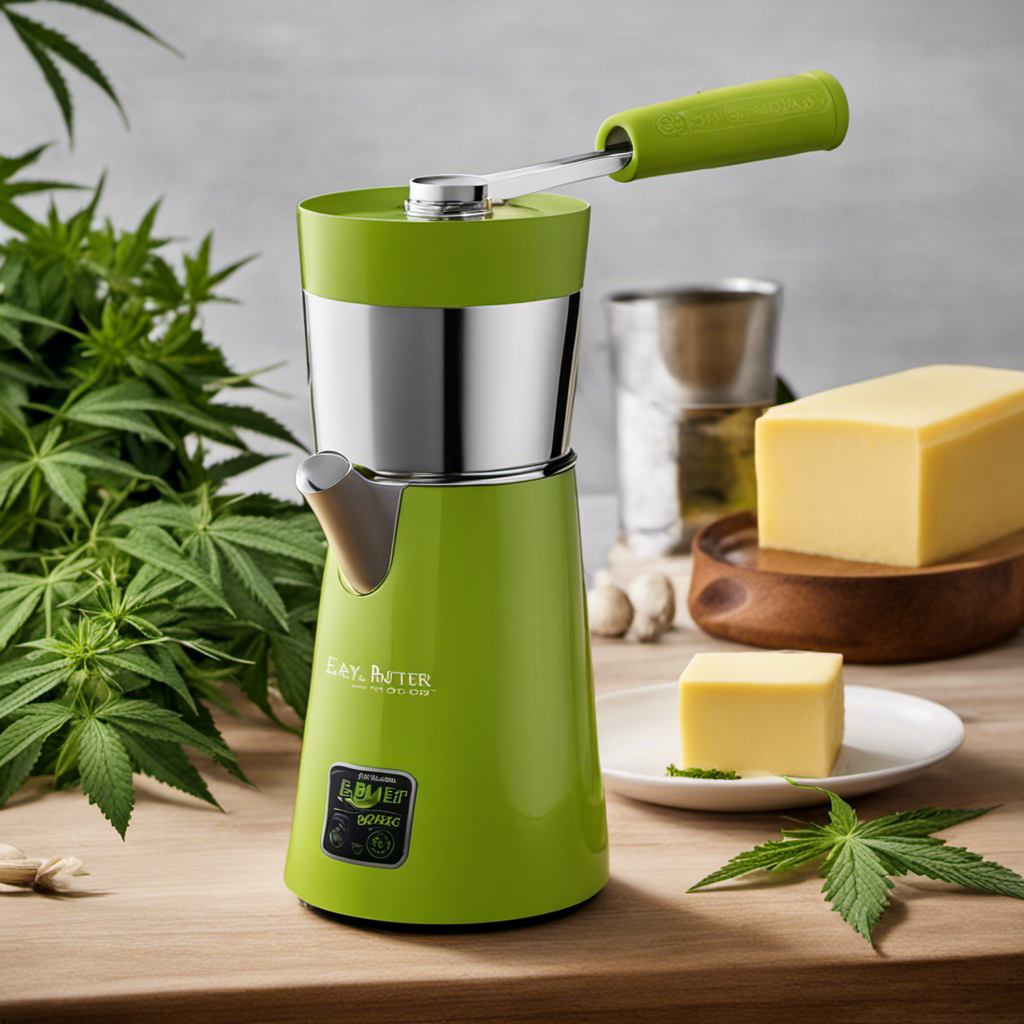
As someone who has a lot of experience with cannabis, I frequently get inquiries about the ideal ratio of weed to butter for the Easy Butter Maker 1 Stick. This is a question that demands accuracy and expertise in order to achieve the desired outcomes.

In this article, I’ll guide you through the process of preparing and packing weed into the Easy Butter Maker, finding the right amount of weed, and maximizing your yield. Get ready to elevate your cannabis-infused butter game with these expert tips and tricks.

Key Takeaways

  • The recommended ratio for making weed-infused butter with the Easy Butter Maker 1 Stick is 1 ounce of decarboxylated cannabis to 1 stick of butter.
  • Experimentation with different strains of cannabis can yield different effects in terms of potency and flavor.
  • Optimal grinding consistency and infusion time variations can affect the potency and flavor of the butter.
  • Finding the right balance between weed and butter proportions, as well as adjusting infusion time, is crucial for achieving the desired outcome.

Understanding the Easy Butter Maker 1 Stick

To understand how much weed you should put in the Easy Butter Maker 1 Stick, follow the instructions provided with the product.

The Easy Butter Maker 1 Stick is a convenient tool for making weed-infused butter at home. It utilizes a simple and efficient weed infusion process, allowing you to effortlessly create infused butter for your culinary adventures.

Advertisement

The instructions will guide you on the ideal amount of weed to use, ensuring that you achieve the desired potency and flavor. Additionally, the instructions will provide valuable tips and troubleshooting advice to address common issues that may arise during the butter-making process.

Recommended Weed to Butter Ratio for Easy Butter Maker

For the recommended ratio, you’ll want to use a specific amount of cannabis when using the Easy Butter Maker with one stick of butter. It’s important to consider the potency of the weed you are using to achieve the desired effects in your butter infusion.

Here are some key points to keep in mind:

  • Start with a ratio of 1 ounce of decarboxylated cannabis to 1 stick of butter. This ratio will ensure a potent infusion without overpowering the taste of the butter.

  • Adjust the ratio based on your personal preference and tolerance. If you prefer a milder potency, you can reduce the amount of cannabis used. Conversely, if you prefer a stronger infusion, you can increase the amount of cannabis.

  • Experiment with different strains of cannabis to achieve different effects. Each strain has its own unique potency and flavor profile, so feel free to explore and find your favorite combination.

Step-by-Step Guide: Preparing Weed for the Easy Butter Maker

Advertisement

When it comes to making butter with the Easy Butter Maker, there are a few key points to keep in mind.

First, it’s important to consider the quantity of weed you’re using. While the recommended ratio is typically one stick of butter to one ounce of weed, it’s always a good idea to adjust based on personal preference and tolerance level.

Second, achieving the optimal grinding consistency is crucial for a successful infusion. Using a grinder or chopping the weed finely will help maximize the surface area for efficient butter extraction.

Lastly, infusion time variations can lead to different potency levels, so experimenting with different durations can help you find the perfect balance of flavor and effects.

Weed Quantity Recommendations

You should consider using about 7 grams of weed for the easy butter maker 1 stick. This recommended dosage will ensure that you achieve a potent and flavorful infusion without overwhelming the butter. However, it’s important to note that the ideal amount of weed may vary depending on personal preference and desired potency. It’s always a good idea to start with a smaller amount and gradually increase if needed.

Advertisement

When experimenting with infusion time, keep in mind that longer infusion times can result in a stronger potency, while shorter infusion times may yield a milder effect. It’s recommended to start with a minimum infusion time of 2 hours and adjust accordingly based on your desired outcome. Remember to stir the mixture occasionally to ensure even distribution of cannabinoids.

  • Start with 7 grams of weed
  • Increase dosage if desired potency is not achieved
  • Experiment with infusion time to find the perfect balance of flavor and potency

Optimal Grinding Consistency

To achieve the optimal grinding consistency, it’s important to use a high-quality grinder that will evenly break down the weed into fine particles. The grind consistency plays a crucial role in achieving the desired potency of your infused butter or oil.

When the weed is finely ground, it allows for better extraction of cannabinoids and terpenes, resulting in a more potent final product. A consistent grind ensures that all the particles are evenly exposed to the solvent during the infusion process, maximizing the extraction efficiency. This ultimately leads to a more potent and flavorful butter or oil.

Now that we understand the importance of grind consistency, let’s explore the next factor that affects the quality of your infusion: infusion time variations.

Infusion Time Variations

Understanding infusion time variations is crucial for achieving the desired potency and flavor in your infused butter or oil. Experimenting with infusion time allows you to customize your infusion process and find the perfect balance for your needs. Here are three key points to consider when it comes to infusion time:

  • Shorter infusion time: A shorter infusion time can result in a milder flavor and potency. This is ideal for those who prefer a more subtle effect or want to use the infused butter or oil in recipes that require a more delicate flavor.

  • Longer infusion time: On the other hand, a longer infusion time can lead to a stronger flavor and higher potency. This is suitable for individuals seeking a more intense experience or who plan to use the infused butter or oil in recipes that can handle a bolder taste.

  • Balancing flavor and potency: Finding the right balance between flavor and potency is a matter of personal preference. By experimenting with different infusion times, you can determine the ideal duration that suits your needs and desired outcome.

How to Pack Weed Into the Easy Butter Maker 1 Stick

When using the Easy Butter Maker 1 Stick, it’s important to properly pack the weed. The packing technique plays a crucial role in ensuring the best infusion results.

Advertisement

First, break down the weed into small pieces, ensuring that there are no large stems or seeds. Then, gently fill the Easy Butter Maker with the ground weed, making sure not to overpack it. Overpacking can lead to clogs and uneven infusion.

It’s also important to avoid tightly compacting the weed, as this can restrict the flow of butter or oil during the infusion process. If you encounter any issues while packing, such as difficulty fitting all the weed, try slightly loosening the packed material or using a smaller amount.

Following these packing techniques will help you achieve the best results with the Easy Butter Maker 1 Stick.

Achieving the Perfect Infusion: Weed and Butter Proportions

For the perfect infusion, make sure the proportions of weed and butter are balanced. Achieving the right ratio is crucial for a successful weed-infused butter.

Here are some key points to consider:

Advertisement
  • Start with quality ingredients: Use high-quality weed and unsalted butter for the best results.

  • Determine the desired potency level: The amount of weed you use will depend on how potent you want your butter to be. It’s important to find the right balance to achieve the desired effect.

  • Experiment and adjust: It may take some trial and error to find the perfect ratio that works for you. Start with a smaller amount of weed and gradually increase until you find the desired potency.

Overpacking Vs. Underpacking: Finding the Right Amount of Weed

To achieve the perfect infusion, it’s important to find the right amount of weed by experimenting with overpacking and underpacking.

When it comes to weed infusion techniques, the quantity of herb you use can make a significant difference in the final product. Overpacking refers to using a larger amount of weed than recommended, while underpacking means using less than the recommended amount.

Both methods have their pros and cons. Overpacking can result in a stronger infusion, but it may also lead to a more potent taste and potentially overpowering effects. On the other hand, underpacking may result in a milder infusion, but it allows for better control over the flavors and effects.

Ultimately, finding the right balance between overpacking and underpacking is a personal preference that requires experimentation with herb quantities.

Factors to Consider: Potency and Desired Effects

When it comes to consuming cannabis, understanding the THC content and dosage is crucial.

Advertisement

The potency of THC can vary greatly among different strains, so it’s important to be aware of the levels and how they may affect you.

Additionally, selecting the right strain for your desired effects is key, as different strains can produce different experiences.

Lastly, personal tolerance levels play a significant role in determining the appropriate dosage for each individual.

Knowing your own tolerance can help you achieve the desired effects without overdoing it.

THC Content and Dosage

You should always consider the THC content and dosage when determining how much weed to put in the Easy Butter Maker 1 stick. THC, or tetrahydrocannabinol, is the main psychoactive compound in cannabis that produces the desired effects. The dosage refers to the amount of THC you want to infuse into your butter or oil.

Advertisement

Here are three important things to keep in mind:

  • Start low and go slow: It’s important to begin with a small dosage and gradually increase it to find your desired potency level.
  • Consider your tolerance: If you are a beginner or have a low tolerance, you may want to use less weed to avoid overwhelming effects.
  • Know your strain: Different strains have varying levels of THC, so understanding the potency of your chosen strain will help you determine the appropriate dosage.

Considering the THC content and dosage is crucial for achieving the desired effects and avoiding any unwanted side effects.

Now, let’s move on to the next important aspect: strain selection importance.

Strain Selection Importance

Understanding the importance of selecting the right strain is crucial for achieving the desired effects when infusing THC into your butter or oil using the Easy Butter Maker 1 stick.

Strain selection plays a significant role in determining the potency and overall experience of your infused product. When choosing a strain, it is essential to consider the desired effects and potency levels.

Some strains are known for their uplifting and energizing effects, while others are more relaxing and sedating. Additionally, potency considerations are vital as different strains have varying levels of THC content.

Advertisement

Higher THC strains may provide a more intense experience, while lower THC strains may offer a milder effect. By carefully selecting the right strain, you can ensure that your infused butter or oil delivers the desired potency and effects.

Personal Tolerance Levels

Finding the right strain is crucial for achieving the desired effects, as personal tolerance levels can vary. When it comes to weed tolerance, everyone is different, and what might work for one person might not work for another. Experimentation with infusion times is also important, as the length of time you infuse your cannabis into the butter can affect the potency of the final product.

Here are three key factors to consider when it comes to personal tolerance and infusion times:

  • Start with a low dose: If you are new to cannabis or have a low tolerance, it is recommended to start with a lower amount of weed when making cannabis butter. This will allow you to gauge your tolerance and adjust accordingly.

  • Gradually increase dosage: If you find that the initial dosage was not strong enough, you can gradually increase the amount of weed used in the infusion process. This will help you find the right balance for your desired effects.

  • Keep track of infusion times: Experimenting with different infusion times can also impact the potency of your cannabis butter. Start with shorter infusion times and gradually increase to find the optimal time for your desired effects.

Adjusting the Weed Quantity for Personalized Cannabis Butter

To personalize your cannabis butter, simply adjust the quantity of weed you put in the Easy Butter Maker 1 stick according to your preference.

When it comes to weed strain selection, it’s important to consider the desired effects and flavors you want in your butter. Different strains have varying levels of THC and CBD, which can affect the potency and medicinal properties of your butter.

Advertisement

Adjusting the infusion time is another factor to consider. Longer infusion times can result in a stronger butter, while shorter times may produce a milder effect. Experimentation is key to finding the perfect balance for your desired potency.

Now, let’s explore some tips and tricks for maximizing weed yield in the Easy Butter Maker.

Tips and Tricks for Maximizing Weed Yield in the Easy Butter Maker

One tip for maximizing your weed yield in the Easy Butter Maker is to ensure you’re using high-quality cannabis. Using top-notch buds will guarantee a more potent and flavorful butter.

To further enhance your cannabis butter-making experience, here are some additional tips and tricks:

  • Maintain an optimal temperature: It’s crucial to monitor and maintain the temperature throughout the infusion process. This will ensure proper decarboxylation and extraction of cannabinoids without damaging the delicate compounds.

  • Grind your cannabis finely: Grinding the cannabis into a fine consistency will increase the surface area, allowing for better extraction and infusion of cannabinoids into the butter.

  • Troubleshooting common issues: If you experience uneven results or weak potency, try adjusting the infusion time or the amount of cannabis used. Experimentation will help you find the perfect balance for your desired strength and flavor.

Conclusion

In conclusion, using the Easy Butter Maker 1 Stick is like embarking on a culinary adventure with weed as your magical ingredient.

Advertisement

Just as a skilled chef carefully measures each ingredient, finding the perfect balance of weed and butter is crucial for a successful infusion. By understanding the potency of your weed and the desired effects, you can personalize your cannabis butter to perfection.

So, grab your Easy Butter Maker, follow the step-by-step guide, and let the magic begin as you unlock the full potential of your weed through this innovative device.

Happy infusing!

Continue Reading
Advertisement

Recipes & Culinary Uses

Gourmet Lobster: Best Butter Poached Lobster Recipe!

Celebrate culinary excellence with our luxurious butter-poached lobster recipe, a decadent dish that will elevate your dining experience to new heights.

Published

on

By

delicious lobster with butter

Indulge in the epitome of culinary decadence with our exquisite butter-poached lobster recipe that promises to elevate your dining experience to new heights. Customize with garlic, chives, and Sauvignon Blanc for rich flavors. Use the Beurre Monté technique for a velvety sauce and maintain a gentle simmer during cooking. Opt for cold-water lobster tails, thawed and patted dry for even cooking. Serve with Chardonnay or Sauvignon Blanc for a gourmet touch. Pair with herbed risotto or lemon-infused asparagus. Enhance your dish further by choosing quality ingredients and complementary sides. Elevate your cooking and impress with a sophisticated meal.

Key Takeaways

  • Choose quality cold-water lobster tails for superior flavor and texture.
  • Implement Beurre Monté technique for a velvety sauce.
  • Use white wine, garlic, and lemon juice for enhanced flavors.
  • Serve with complementary sides like herbed risotto or lemon-infused asparagus.
  • Follow precise cooking techniques for tender, gourmet butter-poached lobster.

Recipe Overview

For a delectable dining experience, let's explore the enticing Recipe Overview of butter poached lobster. When preparing butter poached lobster tails, fresh lobster meat is the star of the show. The tails are gently poached in a luxurious bath of butter and poaching liquid over low heat to make sure they remain tender and juicy. The recipe typically calls for unsalted butter, white wine, and a selection of herbs to infuse the meat with rich flavors.

The process of poaching the lobster in butter results in a glossy sauce known as Beurre Monté that elevates the dish to a gourmet level. This classic cooking technique not only enhances the natural sweetness of the lobster but also creates a velvety texture that's truly indulgent.

The simplicity of the ingredients paired with the impressive results make butter poached lobster a go-to dish for special occasions or when you want to pamper yourself with a decadent meal.

Ingredients and Substitutions

recipe flexibility and options

Let's talk about the importance of ingredient variety and substitution options when preparing butter-poached lobster.

By exploring different herbs, spices, and flavor profiles, you can tailor the dish to your liking.

Understanding potential ingredient swaps allows for flexibility in creating a customized butter-poached lobster recipe that suits your taste preferences.

Advertisement

Ingredient Variety

Customize the flavors of your butter-poached lobster by experimenting with sliced garlic cloves, chopped chives, or other herbs and spices.

When using cold-water lobster tails for this recipe, make sure to thaw them thoroughly before cooking.

To make butter-poached lobster, start by heating the unsalted butter over low heat. Add the lobster tails and poach them for about one minute until the meat is just cooked through.

For added depth, consider using wines like Sauvignon Blanc, Pinot Grigio, or Chardonnay in your poaching liquid. These wines can complement the delicate flavors of the lobster and butter.

By choosing unsalted butter, you can better control the saltiness of the dish. Feel free to adjust the herbs and spices to suit your taste preferences.

Advertisement

This way, you can create a butter-poached lobster dish that's truly unique and tailored to your liking.

Substitution Options

Consider substituting ingredients in your butter poached lobster recipe to create new and exciting flavor variations. Swap frozen cold water lobster tails with warm water ones for a different taste experience.

Instead of using unsalted butter, try clarified butter or ghee to add a nutty richness to the dish. Experiment with herbs like tarragon, thyme, or basil to customize the flavor profile to your liking. Enhance the savory notes by adding minced shallots or onions to the poaching liquid.

For a deeper flavor dimension, replace white wine with dry vermouth or seafood stock in the recipe. These substitutions can elevate your butter poached lobster dish and offer a fresh take on this gourmet delicacy.

Don't be afraid to mix and match these ingredients to create a buttery lobster masterpiece that suits your palate perfectly.

Advertisement

Cooking Techniques

mastering culinary skills efficiently

To achieve a velvety sauce for your Butter Poached Lobster Tail, implement the finest technique – Beurre Monté. This method creates a stable emulsion using butter and liquid, enhancing the luxuriousness of the dish.

When preparing the lobster tails, use kitchen shears to carefully remove the meat, ensuring precision and minimal damage. Cook the lobster tails over low heat in the poaching liquid to maintain tenderness.

Thawing frozen lobster tails thoroughly and patting them dry before poaching is essential for even cooking and ideal texture. Keep the poaching liquid at a gentle simmer to prevent overcooking.

Checking the doneness of the lobster tails by observing their opaque appearance helps prevent them from becoming tough and rubbery. By following these cooking techniques, you can elevate your Butter Poached Lobster Tail to a gourmet level, impressing even the most discerning seafood connoisseurs.

Cooking Tips

improve your culinary skills

When cooking lobster, using a thermometer guarantees perfect doneness every time.

Thawing frozen lobster tails thoroughly is vital to prevent uneven cooking.

Remember to pat dry the lobster tails before poaching to avoid excess water in the poaching liquid.

Advertisement

Lobster Cooking Techniques

For a perfectly cooked lobster tail, maintain a precise poaching temperature of 180F using a thermometer.

When poaching lobster tails, remember the following tips:

  • Thaw frozen lobster tails thoroughly and pat them dry to prevent excess water in the cooking liquid.
  • Avoid overcrowding the saucepan to guarantee even cooking of the lobster tails.
  • Remove the digestive vein from the lobster tail meat and clean it thoroughly before cooking.

To prepare the Butter Poached Lobster Tail recipe, use unsalted butter, fresh lemon juice, dry white wine, and a pinch of red pepper flakes.

Heat the butter over low heat in a saucepan, add one piece of the cleaned lobster tail at a time, and poach them gently until they reach the desired doneness.

Remember to check the lobster tails a few minutes before the recommended cooking time to prevent overcooking them.

Enjoy the succulent and flavorful lobster tails prepared using these cooking techniques.

Advertisement

Lobster Serving Suggestions

Consider pairing your butter-poached lobster with Chardonnay or Sauvignon Blanc for a delightful wine accompaniment. To complement the succulent lobster, serve it alongside a citrusy quinoa salad or warm baguette slices. Enhance the meal further by adding herbed risotto or lemon-infused asparagus for an explosion of flavors.

When dealing with leftovers, remember to refrigerate them promptly in an airtight container to maintain freshness. When reheating, use a gentle heat setting on a pan. Incorporate a bit of the poaching liquid to keep the lobster moist and prevent it from becoming overcooked. This method will help retain the lobster's tenderness and flavors, ensuring a delicious meal even when reheating.

Serving, Storage, and Reheating

meal prep essentials explained

To maintain freshness and flavor, refrigerate any leftover butter-poached lobster promptly in an airtight container.

When it comes to serving, storage, and reheating your delectable lobster, here are some essential tips to guarantee a delightful culinary experience:

  • Refrigerate promptly: Store any uneaten lobster in an airtight container in the refrigerator to prevent spoilage and preserve its quality.
  • Reheat gently: When reheating, use a pan over low to medium heat to prevent overcooking and maintain the lobster's tenderness.
  • Utilize poaching liquid: Incorporate a bit of the poaching liquid when reheating to keep the lobster meat moist and flavorful.

Butter Poached Lobster

delicious lobster cooked perfectly

Enhance your culinary skills by mastering-immerse yourself in the exquisite art of butter poached lobster, a decadent dish that elevates the flavors of tender lobster meat with a rich and velvety texture.

Butter poached lobster involves gently cooking juicy lobster in a mixture of butter and white wine, creating a rich and flavorful dish perfect for special occasions. The use of Beurre monté, a French technique, results in a velvety sauce that heightens the delicate texture of the lobster.

The gentle cooking process of butter poached lobster guarantees that the lobster remains tender and juicy, without losing its natural sweetness. The poaching liquid used can also be served alongside the lobster, adding an extra layer of flavor and richness to the dish.

Advertisement

This gourmet delicacy is ideal for those looking to indulge in a luxurious meal at home or impress guests on special occasions.

Elevate Your Cooking

enhancing culinary skills

Looking to take your culinary skills to the next level? Elevate your cooking with these expert tips for preparing a gourmet butter-poached lobster dish using uncooked lobster tails and the Beurre monté technique:

  • Opt for cold-water lobster tails: Their sweet, delicate flavor and firm texture will enhance your dish, providing a gourmet dining experience.
  • Use quality ingredients: Incorporate white wine, garlic, and lemon juice to enhance the natural flavors of the lobster, creating a luxurious and flavorful meal.
  • Pair with complementary sides: Serve your butter-poached lobster with herbed risotto or lemon-infused asparagus to further elevate the dish to a gourmet level.

To ensure success, follow key steps like using kitchen shears for precise lobster tail meat removal and maintaining a gentle simmer during cooking. By implementing these techniques and tips, you'll be on your way to impressing your guests with a sophisticated and delicious lobster feast.

Frequently Asked Questions

What Kind of Butter Do Restaurants Use for Lobster?

Restaurants typically use high-quality unsalted butter for butter-poached lobster to control salt levels and enhance lobster flavor. Some may opt for clarified butter due to its higher smoke point. The choice varies based on chefs' preferences and dish style.

What Is the Tastiest Way to Cook Lobster?

When cooking lobster, the tastiest way is to butter poach it. This technique enhances the natural sweetness and delicate flavor of the meat, creating a luxurious, velvety texture. It's a gourmet experience you won't forget.

How to Season Lobster When Boiling?

When boiling lobster, season it with salt and lemon for sweetness. Enhance flavor by adding herbs like thyme or bay leaves. For a kick, throw in garlic, peppercorns, or red pepper flakes. Customize with paprika or cajun seasoning.

What Is Poaching in Butter?

So, what is poaching in butter? Well, it's a gentle cooking method where food luxuriates in warm, melted butter. This technique keeps things moist and intensifies flavors, resulting in tender, silky dishes.

Advertisement

Conclusion

Just like a lobster gracefully glides through the ocean depths, this butter poached lobster recipe will elevate your culinary skills to new heights.

With each succulent bite, you'll feel as though you're diving into a sea of gourmet flavors.

So, don't be afraid to take the plunge and try this luxurious dish – you'll be swimming in deliciousness in no time!

Continue Reading

Recipes & Culinary Uses

Creamy Delight: Best Butter Pecan Ice Cream Recipe for Summer!

Yearning for a creamy summer treat that will leave you craving more?

Published

on

By

butter pecan ice cream

Savor a delicious summer treat with our Butter Pecan Ice Cream recipe. Mix butter, brown sugar, cream, and pecans for a creamy delight. Melt butter, cook pecans, whisk eggs, and blend for a rich flavor. Add pecans, cream, and vanilla, then freeze to perfection. Master this easy-to-follow recipe for a tasty dessert to beat the heat.

Key Takeaways

  • Rich and creamy blend of butter, brown sugar, and heavy cream
  • Toasted pecans for a nutty crunch and flavor
  • Easy-to-follow steps for homemade ice cream perfection
  • Customization options with variations like bourbon or chocolate
  • Perfect summer treat with a decadent, refreshing taste

Recipe Ingredients for Butter Pecan Ice Cream

To create a delectable batch of butter pecan ice cream, gather the essential ingredients listed in the recipe.

You'll need:

  • Butter
  • Brown sugar
  • Heavy cream
  • Pecans

These ingredients combine to bring out the rich and nutty flavors of this classic dessert.

The brown sugar adds a caramel-like sweetness, while the heavy cream contributes to a creamy texture that's essential for a decadent treat.

Pecans, when toasted in butter, provide a delightful crunch and enhance the overall flavor profile of the ice cream.

Cooking Instructions for Homemade Ice Cream

making ice cream at home

Start by melting butter in a skillet to infuse the pecans with a rich, nutty flavor for your homemade butter pecan ice cream.

Here's a quick guide to help you make this creamy delight:

Advertisement
  • Melt butter and cook pecans for flavor.
  • Whisk eggs and combine with half-and-half and brown sugar for a creamy base.
  • Cook until thickened, then mix with eggs in a bowl.
  • Add cream, pecans, and vanilla extract.
  • Freeze the mixture in an ice cream maker.

Following these steps will guarantee your homemade butter pecan ice cream turns out rich and delicious.

Remember to carefully adhere to the manufacturer's instructions for your ice cream maker to achieve the perfect consistency.

Enjoy the process of creating this delightful treat that will surely be a hit during the summer months.

Ice Cream Preparation Steps

ice cream recipe instructions

Mix half and half with brown sugar over medium heat in a large bowl to prepare the ice cream base.

Next, whisk beaten eggs and temper them with the warm milk mixture to create a smooth custard.

Once done, thicken the mixture on low heat, then cool it over an ice bath to achieve ideal texture.

After that, stir in heavy cream, vanilla extract, maple extract, and a pinch of salt for rich flavor.

Advertisement

Remember to refrigerate the mixture for 1 1/2 – 2 hours before churning it into creamy butter pecan ice cream.

This process ensures that the flavors meld together beautifully and the ice cream attains the perfect consistency for scooping and savoring.

Nutritional Information and Tips

healthy eating guidance provided

Considering the rich and creamy nature of homemade butter pecan ice cream, it's important to be mindful of its nutritional content and serving size. When indulging in this delectable dessert, remember these essential tips:

  • Portion Control: Enjoy in moderation to savor the flavors without overindulging.
  • Brown Sugar Sweetness: Opt for a moderate amount of brown sugar to balance sweetness without overwhelming the palate.
  • Room Temperature Ingredients: Confirm ingredients like butter and heavy cream are at room temperature for a smoother texture.
  • Nutritional Awareness: Be mindful that homemade butter pecan ice cream can vary in nutritional content, so adjust ingredients accordingly.
  • Consultation: Seek advice from a nutritionist or healthcare provider for personalized guidance on incorporating this treat into a balanced diet.

Homemade Butter Pecan Ice Cream Variations

delicious homemade ice cream

Explore creative twists on traditional butter pecan ice cream by incorporating different nuts, spirits, sauces, chocolates, and dairy-free alternatives.

For a unique flavor, try substituting pecans with walnuts or almonds in the full recipe. Toast the nuts in a separate bowl until browned and fragrant, then chop them finely enough to coat in the ice cream mixture.

To add a boozy kick, mix in a splash of bourbon or rum to the base as you churn the ice cream. For an extra indulgent touch, swirl in caramel sauce or fudge ripple throughout the mixture.

Incorporate chunks of chocolate or chocolate-covered nuts for a delightful contrast in texture, giving each bite a sweet surprise.

Advertisement

If you prefer a lighter, dairy-free option, consider using coconut milk or almond milk as a substitute for traditional dairy products. These alternatives provide a creamy base while catering to plant-based diets.

Experiment with these variations to create a personalized butter pecan ice cream that suits your taste preferences.

Frequently Asked Questions

What Is the Secret to Making Ice Cream Very Creamy?

To make ice cream very creamy, you use a rich base of ingredients like heavy cream, eggs, and sugar. Chilling the base before churning is crucial for a smoother texture. Adding vanilla extract enhances creaminess, and slow churning prevents a dense outcome.

What Flavor Is the Ice Cream in Butter Pecan?

The ice cream in butter pecan is a delightful blend of buttery richness, vanilla sweetness, and maple undertones, perfectly paired with toasted pecans for a nutty crunch. This flavor combination creates a harmonious and indulgent treat.

What's the Difference Between Butter Pecan Ice Cream and Praline Pecan Ice Cream?

In butter pecan ice cream, you'll savor the buttery richness of pecans blended with a creamy base. On the other hand, praline pecan ice cream highlights caramelized sweetness with a swirl of praline sauce for a delightful flavor contrast.

Advertisement

What Age Group Eats Butter Pecan Ice Cream?

You'll find that adults and older individuals, typically in the 30-60 age group, enjoy butter pecan ice cream. It's a favorite among those with a more refined palate, drawn to its rich and nutty flavor.

Conclusion

So there you have it, folks! Whip up this buttery, nutty delight for a taste of summer in every scoop.

Don't cry over spilled milk – grab a cone and enjoy this creamy treat that's sure to satisfy your sweet tooth.

Get churning and indulge in the best butter pecan ice cream you've ever tasted!

Advertisement
Continue Reading

Recipes & Culinary Uses

Festive Favorites: Best Peanut Butter Blossoms Recipe for Holidays!

Unleash the ultimate holiday baking magic with the best Peanut Butter Blossoms recipe – an irresistible treat that will elevate your festive celebrations!

Published

on

By

holiday baking with flair

Elevate your holiday baking with the ultimate Peanut Butter Blossoms recipe. Cream together peanut butter, butter, sugars, and salt, then add egg and vanilla. Roll dough into balls, coat in brown sugar, bake until golden, then press a Hershey's kiss on top. Adjust baking time as needed. Explore ingredient swaps for a personalized touch. Enjoy with hot cocoa or pair with savory dishes. For more tips, ideas, and customization options, the recipe holds more festive surprises.

Key Takeaways

  • Cream together peanut butter, butter, sugars for rich flavor.
  • Bake at 375°F for 8-10 minutes for soft, chewy cookies.
  • Customize with ingredient swaps like almond butter or maple syrup.
  • Pair with savory dishes or hot cocoa for holiday enjoyment.
  • Press Hershey kisses onto warm cookies for a classic finish.

Ingredients for Peanut Butter Blossoms

For the classic Peanut Butter Blossoms recipe, gather peanut butter, butter, sugar, an egg, and Hershey's kisses as your essential ingredients.

Peanut butter is the star, offering a rich flavor that blends perfectly with the sweetness of the cookies.

Butter plays a pivotal role by adding moisture and richness to the dough, ensuring a soft and chewy texture.

The sugar not only sweetens the cookies but also contributes to their festive appeal, making them a perfect treat for any occasion.

Finally, the Hershey's kisses on top provide a delightful chocolatey finish that elevates these cookies to a whole new level of deliciousness.

Advertisement

Together, these ingredients create a harmonious blend of flavors and textures that make Peanut Butter Blossoms a beloved classic for holiday baking or any time you crave a sweet and satisfying treat.

Recipe Steps for Peanut Butter Blossoms

bake peanut butter cookies

To make Peanut Butter Blossoms, start by creaming together peanut butter, butter, sugars, and salt until light and fluffy.

Next, add in the egg and vanilla extract, making sure to mix well to combine all the ingredients thoroughly.

Then, gradually incorporate the dry ingredients into the wet mixture until a smooth dough forms.

Once the dough is ready, roll it into balls and coat each ball generously in brown sugar.

Place the sugar-coated dough balls on a baking sheet, making sure to leave enough space between them for spreading during baking.

Advertisement

Bake the cookies in a preheated oven until they turn a beautiful golden brown.

As soon as the cookies are out of the oven, press a Hershey's kiss into the center of each cookie gently.

The heat from the freshly baked cookies will melt the chocolate just enough to adhere it to the cookie.

These Peanut Butter Blossoms are a delightful treat perfect for Christmas celebrations!

Pro Tips for Making Peanut Butter Blossoms

baking perfect peanut blossoms

To enhance your peanut butter blossom baking experience, consider adjusting the baking time based on your oven's performance for best results.

Additionally, explore ingredient substitutions to cater to dietary preferences or allergies without compromising the flavor or texture of the cookies.

Advertisement

These pro tips can help you customize your peanut butter blossoms while ensuring delicious outcomes.

Baking Time Recommendations

Achieving the ideal texture for your peanut butter blossoms involves baking them at 375°F for 8-10 minutes. This baking duration guarantees that the cookies have a soft and chewy consistency while allowing the Hershey kisses on top to be softened but not completely melted.

Once out of the oven, remember to press the Hershey kisses onto the cookies immediately to secure them in place for that classic appearance.

For the best outcomes, chill the cookie dough for about 30 minutes before baking. This step helps the cookies maintain their shape and prevents excessive spreading during baking, ensuring your peanut butter blossom cookies are perfectly formed and ready to impress during your holiday baking.

Shortening or extending the baking time can alter the texture of the cookies. A quick bake of 6-8 minutes produces softer and chewier cookies, while longer baking times yield a slightly crispier consistency. Stick to the recommended 8-10 minutes for the best soft and chewy peanut butter blossoms.

Advertisement

Ingredient Substitutions

Consider incorporating different ingredients to elevate the flavor and nutritional profile of your peanut butter blossoms. For a healthier option, swap out shortening with unsalted butter to achieve a unique texture and taste in your cookies.

Try using natural peanut butter instead of creamy to add a wholesome twist to the classic recipe. If you're looking to reduce the glycemic impact, substitute brown sugar with coconut sugar in your baking. For a natural sweetener alternative, replace regular granulated sugar with maple syrup in the cookie dough mixture.

Additionally, for a distinct flavor experience, experiment with almond butter as a substitute for peanut butter in your blossoms. These ingredient substitutions can bring a new dimension to your peanut butter blossoms, making them not only delicious but also tailored to your dietary preferences.

Upgrade your baking game this holiday season with these creative twists on a beloved recipe!

Serving Suggestions for Peanut Butter Blossoms

peanut butter cookie recipe

Enhance the enjoyment of your peanut butter blossoms by pairing them with savory dishes like lasagna tortellini soup for a satisfying meal. These classic cookies also complement family-friendly dinners such as easy ground beef shepherd's pie and creamy broccoli cheddar soup, making for a delightful combination. The holiday season calls for cozy treats, and the sweet nuttiness of peanut butter blossoms pairs perfectly with a warm cup of hot cocoa. Whether you're participating in a cookie exchange or looking for a festive touch to your holiday dessert spread, consider rolling the cookies in red, green, and white sugar sprinkles to add a pop of color and fun.

Serving Suggestions Pairing Ideas
Lasagna Tortellini Soup Comforting and hearty meal alongside the cookies
Easy Ground Beef Shepherd's Pie Delicious combination for a family dinner
Creamy Broccoli Cheddar Soup Perfect accompaniment to the nutty cookie flavors

12 Days of Christmas Cookies Recipes

baking traditions for the holidays

Indulge in a variety of delightful Christmas cookie recipes each day during the holiday season. One standout choice is the classic Peanut Butter Blossoms. These holiday cookies feature a peanut butter base topped with a Hershey's kiss, making them a beloved treat for cookie exchanges and festive gatherings.

The process of making these cookies is simple yet rewarding. Start by rolling the dough balls in sugar before baking to add a sweet crunch to each bite. The combination of rich peanut butter flavor and the chocolatey goodness of the Hershey's kiss creates a perfect balance of sweetness.

Advertisement

When enjoying these Christmas cookies, consider pairing them with a glass of milk for a classic and satisfying treat.

Whether you're baking them for your family, a cookie exchange, or a holiday party, Peanut Butter Blossoms are sure to be a hit. Make each day of the holiday season a little sweeter with these delicious cookies.

User Engagement Features

user interaction enhancements

Let's talk about how user interaction features and personalization options enhance your experience with the Peanut Butter Blossoms recipe.

You can engage with others by leaving comments and sharing your results, creating a sense of community around this holiday treat.

Personalization options like name and email entry fields help tailor the experience to your preferences, making it more engaging and enjoyable.

User Interaction Features

Utilizing user engagement features on the website allows for increased participation and feedback from visitors. The comment section enables users to interact with each other and provide valuable feedback on the Peanut Butter Blossoms recipe or share their experiences with Hershey's kisses. By incorporating a reply option, users can engage in conversations, fostering a sense of community around baking these delightful peanut butter cookies.

Advertisement

Moreover, the inclusion of name and email fields not only allows for personalization but also facilitates communication between the website and its visitors. This data storage feature guarantees that users can conveniently access their information for future visits, enhancing their overall user experience.

These user engagement features play an essential role in creating an interactive platform where users can engage, provide feedback, and communicate effectively. Such interaction not only enriches the user experience but also encourages visitors to actively participate in the community surrounding the Peanut Butter Blossoms recipe.

Personalization Options

Enhance your website's user engagement by incorporating personalized options such as commenting, replying, and sharing feedback on the Peanut Butter Blossoms recipe. This level of user interaction not only fosters a sense of community building but also encourages customization and feedback. By allowing users to share their thoughts, results, and experiences with the festive favorites, you create a more engaging and interactive user experience. Additionally, providing users with the option to save their data for future visits and encouraging them to tag @preppykitchen and use #preppykitchen when trying the recipe further enhances their engagement.

Personalization Options Description Benefits
Commenting Users can leave comments on the Peanut Butter Blossoms recipe, sharing their thoughts and experiences. Fosters community building and user engagement.
Replying Users can reply to comments and engage in discussions with other users about the recipe. Encourages active participation and interaction.
Feedback Sharing Users can share feedback on the recipe, providing valuable insights for improvement. Enhances user experience and customization.

Additional Information

clarifying specific details provided

You may find it interesting to know more about the history of the Peanut Butter Blossoms recipe and its cultural significance during the holidays.

  • The Peanut Butter Blossoms recipe's popularity is backed by IRI MULO data, making it a sought-after choice for holiday baking.
  • Copyright for this beloved recipe belongs to The J.M. Smucker Company, a reputable name in the food industry known for quality products.
  • These delightful cookies aren't only perfect for serving at holiday parties but also make excellent gifts due to their festive appeal.

Frequently Asked Questions

Why Are My Peanut Butter Blossoms Dry?

If your peanut butter blossoms are dry, it could be due to using too much flour, overbaking, using natural peanut butter that requires stirring, or not enough butter/shortening. Guarantee precise measurements and follow the recipe closely to maintain moisture.

Why Did My Peanut Butter Blossoms Go Flat?

When making peanut butter blossoms, going flat happens due to overmixing, too much flour, insufficient chilling, or low oven temperature. Remember to avoid these pitfalls. Preheat the oven properly and follow the recipe for perfect blossoms!

What Is America's Favorite Christmas Cookie?

America's favorite Christmas cookie is Peanut Butter Blossoms. Loved for their peanut butter-chocolate combo and nostalgic Hershey's Kiss center, these easy-to-make treats are a holiday staple at parties and gatherings. They're a must-have during the festive season.

Advertisement

What Is Baskin Robbins Peanut Butter Blossom?

You asked about Baskin Robbins Peanut Butter Blossom. It's a delectable seasonal ice cream flavor featuring creamy peanut butter ice cream with a ribbon of more peanut butter and chocolate cookie pieces. Indulge in this festive treat!

Conclusion

Indulge in the warm, gooey goodness of these peanut butter blossoms this holiday season. With the perfect blend of creamy peanut butter and rich chocolate, these cookies are sure to bring joy to your festivities.

Picture yourself surrounded by loved ones, sharing laughter and memories as you enjoy these delicious treats. Let the aroma of freshly baked cookies fill your home and create a cozy, festive atmosphere.

Happy baking and happy holidays!

Advertisement
Continue Reading
Advertisement

Affiliate disclaimer

As an affiliate, we may earn a commission from qualifying purchases. We get commissions for purchases made through links on this website from Amazon and other third parties.

Advertisement

Trending