Connect with us

Household Hacks

How to Draw a Butter Fly

Published

on

An image showcasing a step-by-step guide on drawing a butterfly

As an art enthusiast, I’ve always been captivated by the delicate beauty of butterflies. And what better way to appreciate their intricate details than by learning how to draw them?

In this article, I’ll guide you through the process of creating your very own butterfly masterpiece. From gathering the right materials to adding those final touches, we’ll explore every step together.

So, grab your pencil and let’s embark on this artistic journey of capturing the essence of a butterfly on paper.

Key Takeaways

  • Choose vibrant colors to capture the beauty of butterflies
  • Experiment with different drawing techniques
  • Sketch the basic structure of butterfly wings
  • Use shading techniques and blending to add depth and texture

Gathering Your Materials

Now that you’ve got everything you need, it’s time to start gathering your materials.

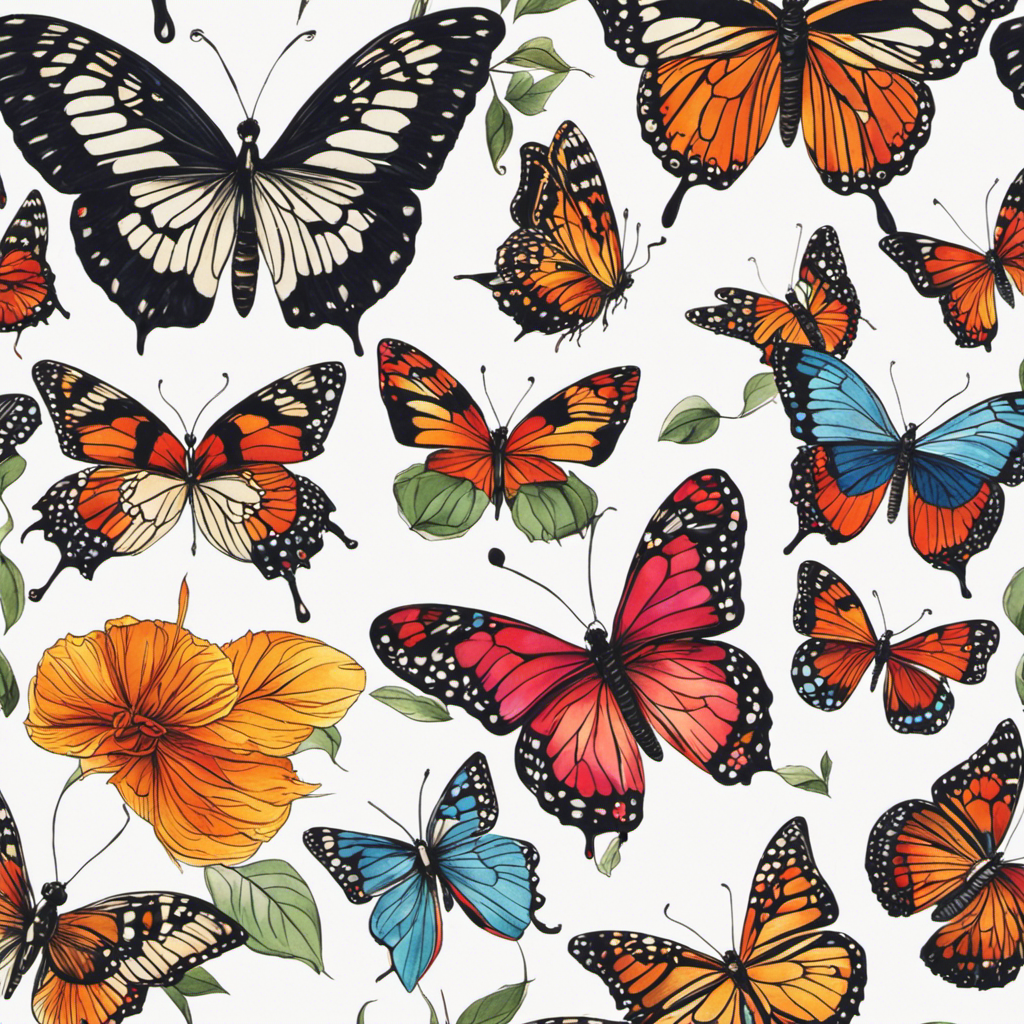
When it comes to drawing a butterfly, choosing the right colors is essential. Butterflies come in a variety of vibrant hues, so it’s important to select colors that capture their beauty. Consider using a combination of bright yellows, blues, pinks, and purples to bring your butterfly to life.

Additionally, exploring different drawing techniques can add depth and texture to your artwork. Experiment with blending colors, using shading techniques, and creating intricate patterns on the wings. Don’t be afraid to get creative and let your imagination soar.

Understanding the Anatomy of a Butterfly

When it comes to understanding the anatomy of a butterfly, two key points to consider are the structure of their wings and the functions of their body parts.

The intricate design of butterfly wings, with their delicate scales and vibrant colors, is truly awe-inspiring. Not only do these wings enable butterflies to fly gracefully, but they also play a crucial role in attracting mates and providing camouflage.

As for their body parts, each one serves a specific function, from the proboscis used for feeding to the antennae that help them navigate their surroundings.

Butterfly Wing Structure

To draw the butterfly’s wings, you can start by sketching the basic structure.

The wings are composed of two main parts: the forewing and the hindwing.

The forewing is larger and more intricate, while the hindwing is smaller and simpler in design.

The patterns on the wings vary greatly among different butterfly species, with intricate designs and vibrant colors.

These patterns have evolved over time to serve multiple purposes.

They can act as camouflage, helping the butterfly blend into its surroundings and avoid predators.

They can also serve as a warning signal to potential predators, indicating that the butterfly is toxic or unpalatable.

Understanding the evolution of butterfly wings and their patterns can provide valuable insight into the fascinating world of these beautiful creatures.

Body Part Functions

Start by examining the different body parts of a butterfly and their specific functions.

The body of a butterfly consists of three main parts: the head, thorax, and abdomen.

The head contains the butterfly’s sensory organs, such as its compound eyes and antennae, which help it detect food and mates.

The thorax is responsible for the butterfly’s flight, as it contains the powerful muscles that control the wings.

The abdomen, on the other hand, houses the butterfly’s digestive system and reproductive organs.

Each body part has specific functions that are essential for the butterfly’s survival and adaptation to its environment.

For example, the compound eyes allow the butterfly to see a wide range of colors and patterns, which helps it locate nectar-rich flowers for feeding.

These adaptations have allowed butterflies to thrive in diverse habitats around the world.

Sketching the Basic Shape

When it comes to sketching a butterfly, there are a few key points to keep in mind.

First, start with an oval shape for the body, as this will serve as the foundation for the rest of the drawing.

Next, focus on outlining the wings first, paying attention to their shape and structure.

Finally, don’t be afraid to vary the shapes and sizes of the wings, as this will add depth and visual interest to your butterfly sketch.

Oval for Body

First, draw a small oval for the body of your butterfly. This will serve as the foundation for the rest of your drawing. Remember to keep the oval relatively small, as the butterfly’s body is slender and delicate.

Now, let’s move on to the next step in creating your beautiful butterfly masterpiece.

To enhance your drawing techniques and bring your butterfly to life, consider incorporating these shading techniques:

  1. Cross-hatching: This method involves drawing intersecting lines to create texture and depth.
  2. Blending: Use a blending stump or your finger to softly blend different shades together for a smooth transition.
  3. Stippling: Create texture by using small dots or stippling to fill in areas with varying shades.
  4. Feathering: Use light, gentle strokes to mimic the delicate appearance of butterfly wings.

Wings’ Outline First

To outline the wings, you’ll want to begin by lightly sketching the basic shape using gentle strokes. It’s important to gather the right materials before starting this step. I recommend using a pencil for the initial sketch and then switching to a fine-tip pen or marker for the final outline. This will give your drawing a clean and polished look.

As for coloring techniques, there are various options to explore. You can use colored pencils, markers, or even watercolors to bring your butterfly to life. Experiment with different shading and blending techniques to create depth and dimension. Remember to use light strokes when coloring to avoid smudging.

Now that we have outlined the wings and discussed coloring techniques, let’s move on to the next step: varying shapes and sizes.

Vary Shapes and Sizes

One way to add visual interest to your wings is by experimenting with different shapes and sizes. When drawing butterfly wings, you can create a captivating effect by playing with various forms. Here are four shapes and sizes you can incorporate into your butterfly drawings:

  1. Elongated wings: These wings give your butterfly a graceful and elegant appearance. They can be slightly curved or straight, depending on the desired effect.

  2. Rounded wings: These wings create a softer and more gentle look for your butterfly. They are perfect for portraying a delicate and whimsical character.

  3. Angular wings: These wings have sharp edges and angles, giving your butterfly a bold and dynamic presence. They are great for conveying strength and power.

  4. Irregular wings: These wings have unique and asymmetrical shapes. They add a touch of quirkiness and individuality to your butterfly.

Adding Details to the Wings

Now let’s start adding some details to the wings of the butterfly. When it comes to drawing a butterfly, adding color and creating texture are important steps to make it come to life. To achieve this, I recommend using a combination of different art supplies such as colored pencils, markers, or even watercolors. The key is to be creative and experiment with different techniques to add depth and vibrancy to the wings. For example, you can use cross-hatching to create texture or blend colors together to achieve a gradient effect.

To help you visualize the process, here’s a table showcasing some color and texture ideas for butterfly wings:

Color Scheme Texture Technique Result
Vibrant Stippling Bold
Pastel Sponging Soft
Monochrome Scumbling Subtle

Drawing the Body and Antennae

You can start by sketching the oval-shaped body of the butterfly, making sure it is proportional to the size of the wings. The body should be elongated and slightly curved, representing the abdomen and thorax.

Here are some tips to help you draw the body and antennae of the butterfly:

  1. Draw a long, thin oval for the body, starting from the center of the wings.
  2. Add a small circle at the top of the body for the head.
  3. Extend two curved lines from the head to create the antennae, adding small oval shapes at the end.
  4. To add details, draw small lines along the body to represent segments.

Remember to keep the body slender and delicate, as it complements the elegance of the wings.

Once the body is complete, you can move on to adding the eyes and other intricate details.

Coloring Your Butterfly

To give your butterfly a vibrant and lifelike appearance, start by selecting a variety of colors for its wings. Coloring techniques play a crucial role in achieving a realistic effect. Blending colors is a great way to add depth and dimension to your butterfly’s wings. By gently overlapping different shades, you can create a smooth transition from one color to another. Here’s a table showcasing some color combinations that work well together:

Color 1 Color 2 Color 3
Blue Purple Pink
Orange Yellow Red
Green Turquoise Yellow

Experiment with these combinations or create your own to bring your butterfly to life. Once you’ve colored the wings, you can move on to adding patterns and designs to make your creation even more captivating.

Adding Patterns and Designs

Choose from a variety of patterns and designs to enhance the visual appeal of your vibrant butterfly. Adding patterns and designs to your butterfly not only adds an element of uniqueness but also allows you to showcase your creativity.

To make your butterfly stand out, try experimenting with color combinations, using contrasting or complementary colors to create a striking effect. Incorporating nature-inspired patterns can give your butterfly a realistic and organic look. Consider using delicate floral patterns, intricate leaf designs, or even subtle textures to mimic the natural world.

Here are four ideas to get you started:

  1. Chevron pattern: Create a bold and modern look by adding chevron stripes to your butterfly’s wings.
  2. Polka dots: Add a playful touch by incorporating polka dots in various sizes and colors.
  3. Paisley print: Give your butterfly an exotic and elegant vibe with intricate paisley designs.
  4. Geometric shapes: Experiment with triangles, squares, or hexagons to create a contemporary and geometric feel.

Highlighting and Shading for Realism

Highlighting and shading can bring a realistic dimension to your artwork, adding depth and dimension to your vibrant butterfly. To achieve this effect, there are various highlighting techniques that you can employ.

One popular technique is using a white pencil or a light-colored pastel to create highlights on the wings and body of the butterfly. By gently blending these lighter shades into the surrounding colors, you can create the illusion of light hitting the surface.

Additionally, shading can be achieved by using darker colors or a black pencil to create shadows and contours, giving your butterfly a three-dimensional appearance. Experiment with different blending techniques, such as using a blending stump or your fingertips, to smoothly merge the different shades together.

These techniques will add a sense of realism and depth to your butterfly drawing, making it truly come to life.

As you put the finishing touches and finalize your drawing, it is important to step back and assess your artwork. Look for any areas that may need additional highlighting or shading to enhance the overall realism.

Take your time and pay attention to the details, ensuring that the highlights and shadows are in harmony with the rest of the drawing. Remember, the goal is to create a lifelike depiction of a butterfly, so don’t be afraid to make adjustments and refine your work until you are satisfied with the result.

With the right highlighting and shading techniques, your butterfly will truly take flight on the page.

Finishing Touches and Finalizing Your Drawing

Now that I’ve mastered highlighting and shading for realism, it’s time to move on to the finishing touches and finalize my butterfly drawing. This is where I can truly bring my artwork to life by adding colors and utilizing blending techniques.

To achieve a vibrant and realistic look, I have a few essential steps to follow:

  1. Choose a color palette: Select a range of colors that complement each other and match the natural hues of a butterfly. This will help create a harmonious and visually pleasing final result.

  2. Start with the base colors: Apply the base colors to each section of the butterfly, making sure to blend them smoothly together. This will give the drawing depth and dimension.

  3. Add details and patterns: Use small brushes or pencils to add intricate details such as spots, lines, or patterns on the wings. Take your time and pay attention to the reference image or your imagination.

  4. Blend with care: Utilize blending techniques such as smudging or layering to create a smooth transition between colors. This will make the colors appear realistic and cohesive.

Frequently Asked Questions

How Long Does It Typically Take to Complete a Butterfly Drawing?

Typically, it takes me about 30 minutes to complete a butterfly drawing. I use common techniques like sketching the outline, adding details, and shading. The best materials for this are pencils, colored markers, and fine-tip pens.

What Are Some Common Mistakes to Avoid When Drawing Butterfly Wings?

When drawing butterfly wings, it’s important to avoid common mistakes like incorrect proportions and lack of symmetry. These errors can make the wings look unnatural and detract from the overall beauty of the butterfly.

Can I Use Colored Pencils Instead of Markers for Coloring My Butterfly?

Sure, you can use colored pencils for shading, blending, and adding details to your butterfly drawing. The pros of using colored pencils are the control and precision they offer, while the cons include the limited color range compared to markers.

Are There Any Specific Pencil Techniques I Should Use When Shading the Body and Antennae?

When shading the body and antennae of a butterfly, it’s important to use pencil techniques that create depth and realism. Adding texture to the wings with pencil shading can bring your drawing to life.

Can I Use a Reference Photo or Should I Try to Draw a Butterfly From Memory?

I find that using reference photos can be helpful when drawing butterflies, as they provide a visual guide for accuracy. However, drawing from memory can also be beneficial, allowing for creativity and personal interpretation.

Conclusion

Well, there you have it folks! Drawing a butterfly may seem like a daunting task, but with the right materials and a little bit of practice, you’ll be flying through it like a pro!

Remember to embrace your inner artist and let your imagination take flight as you add those intricate details and vibrant colors.

Don’t forget to give your butterfly some personality with unique patterns and designs.

And finally, don’t be afraid to get a little fancy with shading and highlighting for that extra touch of realism.

So go ahead, spread your artistic wings and create a masterpiece that will make all the other butterflies jealous!

Continue Reading

Household Hacks

What Gets Butter Out of Clothes

Published

on

By

An image showcasing a colorful laundry basket filled with clothes stained by butter

I’ve got some exciting news for you – I’ve discovered the ultimate solution to the dreaded butter stains on clothes!

You know that sinking feeling when you accidentally smear butter on your favorite shirt? Well, worry no more. In this article, I’ll reveal the common household items, effective techniques, and natural remedies that will banish those butter stains for good.

Plus, I’ll share expert tips to ensure you never have to deal with this pesky problem again.

Get ready to say goodbye to butter stains and hello to spotless clothes!

Key Takeaways

  • Dish soap contains enzymes that break down butter stains.
  • Vinegar can effectively remove butter stains.
  • Baking soda can be used as a pre-treatment for butter stains.
  • Consider using commercial products specifically designed for removing butter stains.

Common Household Items for Removing Butter Stains

You can use common household items like dish soap, vinegar, or baking soda to remove butter stains from your clothes. Household products are often the most convenient and cost-effective solutions when it comes to tackling stains.

Dish soap, for example, contains enzymes that can break down the oils in butter, making it easier to remove. Simply apply a small amount of dish soap to the stain, gently rub it in, and let it sit for a few minutes before rinsing with cold water.

Vinegar is another DIY solution that can effectively remove butter stains. Mix equal parts vinegar and water, sponge the mixture onto the stain, and then rinse with cold water.

Baking soda, on the other hand, can be used as a pre-treatment for butter stains. Create a paste by mixing baking soda with water, apply it to the stain, and let it sit for about 30 minutes before washing as usual.

These household items are readily available and can be used to effectively remove butter stains from your clothes. However, if these DIY solutions don’t work, there are other effective stain-removing techniques that can be employed.

Effective Stain-Removing Techniques

To effectively remove stains from your garments, try using a combination of dish soap and warm water. This method is one of the quickest and easiest ways to remove butter stains from clothes.

Simply mix a few drops of dish soap with warm water and gently rub the solution onto the stained area. Allow it to sit for a few minutes and then rinse with cold water.

If the stain persists, you may want to consider using effective commercial products specifically designed for removing butter stains on clothing. These products are formulated to break down the grease and oil in the butter, making it easier to remove.

Transitioning into the subsequent section about natural remedies for butter stains, let’s explore some alternative options that you can try at home.

Natural Remedies for Butter Stains

If you’re looking for a more environmentally-friendly approach, consider using vinegar and baking soda to tackle butter stains on your garments. These DIY butter stain remover recipes are not only effective but also gentle on delicate fabrics.

Here are some tips to help you remove butter stains from your favorite clothes:

  • Mix equal parts vinegar and water in a spray bottle and spritz the stained area.
  • Let the vinegar solution sit for a few minutes to break down the butter.
  • Gently blot the stain with a clean cloth to lift the butter.
  • Create a paste using baking soda and water, and apply it to the remaining stain.
  • Allow the paste to dry completely, then brush it off with a soft brush.
  • Wash the garment as usual to remove any residue.

Expert Tips for Removing Butter From Clothes

For expert tips on removing butter stains from your garments, consider using dish soap and warm water as a pre-treatment solution. This simple and effective method can help break down the butter’s greasy residue, making it easier to remove.

After applying the dish soap and warm water mixture to the stained area, gently rub the fabric together to work in the solution. Then, rinse the garment thoroughly with cold water.

If the stain persists, don’t worry. There are other options available. One option is to use the best detergent for butter stain removal. Look for a detergent that contains enzymes, as they are effective in breaking down grease and oil stains.

If the stain is particularly stubborn, professional dry cleaning may be necessary. Dry cleaners have specialized solvents and techniques that can remove even the toughest butter stains.

Preventing Future Butter Stains on Clothing

To prevent future stains on your clothing, try to be mindful of how you handle butter and avoid any accidental spills. Here are some tips to help you avoid butter spills and prevent future stains:

  • Store butter properly: Keep butter in a covered dish or container to prevent it from melting and spilling onto your clothes.
  • Use butter alternatives: Consider using butter alternatives like margarine or spreads that come in squeeze bottles or tubs, which are less likely to spill.
  • Be cautious when spreading butter: When spreading butter on bread or toast, do it over a plate or a napkin to catch any potential drips.

By following these simple tips, you can prevent future butter stains and keep your clothes looking clean and fresh.

Frequently Asked Questions

Can I Use Dish Soap to Remove Butter Stains From Clothes?

Sure, dish soap can be effective in removing butter stains from clothes. However, using vinegar to remove butter stains is a great alternative method as it helps break down the oils.

Are There Any Special Techniques for Removing Butter Stains From Delicate Fabrics?

When it comes to removing butter stains from delicate fabrics, it’s important to know the proper techniques. There are alternative methods that can be used, and taking preventive measures can help avoid setting the stains.

How Long Should I Let a Butter Stain Remover Sit on the Fabric Before Washing It?

I usually let a butter stain remover sit on the fabric for about 10-15 minutes before washing it. It allows the remover to penetrate the stain and make it easier to remove. Some of the best laundry detergents for removing butter stains are ones with enzymes.

Can I Use a Hairdryer to Speed up the Drying Process After Removing a Butter Stain?

Using a hairdryer to speed up the drying process after removing a butter stain is not recommended. It can cause the stain to set further into the fabric. It’s best to let the fabric air dry or use alternative drying methods.

Is It Necessary to Pre-Treat Butter Stains Before Washing the Clothes?

Before washing clothes with butter stains, it is necessary to pre-treat them. This step helps in preventing the stain from setting and makes it easier to remove later.

Conclusion

Well, there you have it folks. Who knew that removing butter stains from clothes could be such a riveting topic?

But fear not, because armed with the knowledge of common household items, effective stain-removing techniques, natural remedies, and expert tips, you can now conquer any butter-related clothing disaster that comes your way.

So go forth, my butter-stained comrades, and fear not the greasy messes that life throws at you. With these methods in your arsenal, butter stains will be a thing of the past.

Stay clean, stay butter-free, and may your clothes forever be stain-free.

Continue Reading

Household Hacks

How to Quickly Defrost Butter

Published

on

By

-up of a microwave with a plate of frozen butter beside it

I’ve always believed that time is of the essence, especially when it comes to cooking and baking. That’s why I’ve mastered the art of quickly defrosting butter.

In this article, I’ll share with you the best methods I’ve discovered through trial and error. Understanding the science behind butter freezing is crucial, and I’ll explain it to you in simple terms.

Get ready to learn some quick and easy microwave techniques, oven tricks, and even a cold water bath method for rapid butter defrosting.

Let’s get started!

Key Takeaways

  • Quick defrosting of butter allows for easy spreading on bread or toast.
  • Proper defrosting preserves the texture and consistency of the final dish.
  • Slow defrosting can result in soft and oily butter, making it difficult to incorporate evenly into recipes.
  • Alternative methods such as warm water, room temperature, or grating can be used when a microwave is not available.

Why Defrost Butter Quickly Matters

Defrosting butter quickly matters because it allows for easy spreading on bread or toast. The importance of defrosting butter quickly cannot be underestimated, especially when it comes to the impact it has on recipes. Slow butter defrosting can significantly affect the texture and consistency of the final dish.

When butter is slowly defrosted, it tends to become soft and oily, making it difficult to incorporate into the recipe evenly. This can result in a lumpy or greasy texture, which is not desirable in many dishes.

In contrast, when butter is defrosted quickly, it retains its solid form while becoming soft enough to easily mix into batters or doughs. This ensures a smoother and more consistent outcome, enhancing the overall taste and appearance of the dish.

Understanding the Science of Butter Freezing

Understanding the science of how butter freezes can help with its thawing process. When butter is exposed to low temperatures, it undergoes a physical change and solidifies. The freezing process occurs when the temperature of butter drops below its melting point, which is around 32°F (0°C).

The effect of temperature on butter defrosting is significant. As the temperature rises, the butter transitions from a solid to a semi-solid state, making it easier to spread or use in recipes. This is why it’s important to defrost butter at the right temperature to ensure its texture and quality are preserved.

Now, let’s explore the best methods for defrosting butter and how to do it quickly and efficiently.

The Best Methods for Defrosting Butter

To thaw your butter effectively, you can try using the microwave or leaving it at room temperature for a few hours.

If you’re short on time, the microwave is the quickest method. Simply place the wrapped butter in a microwave-safe dish and heat it on the defrost setting for 10-15 seconds at a time, checking and flipping the butter every few seconds until it softens. Be careful not to overheat it, as the butter can melt unevenly.

Alternatively, you can leave the butter at room temperature for a few hours. This method is slower but allows for a more even thaw.

Once the butter is soft and spreadable, you can move on to incorporating it into your recipes.

Now, let’s explore some quick and easy microwave defrosting techniques.

Quick and Easy Microwave Defrosting Techniques

If you’re in a hurry, you can simply pop the wrapped butter in the microwave for 10-15 seconds at a time, checking and flipping it until it softens. However, it’s important to take some microwave safety precautions to ensure you don’t accidentally melt the butter or damage the microwave.

Here are a few alternative defrosting methods you can try if you don’t have a microwave or prefer not to use one:

  • Place the wrapped butter in a ziplock bag and submerge it in a bowl of warm water.
  • Cut the butter into smaller pieces and let it sit at room temperature until it softens.
  • Use a grater to grate the frozen butter into smaller flakes, which will thaw more quickly.

These methods are all safe and effective ways to defrost butter when you’re short on time. However, if you’re looking for another quick option, using the oven can also speed up the defrosting process.

Using the Oven to Speed Up Butter Defrosting

Using the oven is a simple and efficient way to thaw butter in a hurry. When I need softened butter quickly for baking or cooking, I preheat my oven to a low temperature, around 200°F.

I then place the wrapped butter on a baking sheet and pop it into the oven. The low oven temperature gently warms the butter, allowing it to thaw without melting completely. It’s important to keep an eye on the butter and check it frequently to ensure it doesn’t melt.

Butter has a melting point of around 90°F, so it can quickly go from soft to liquid if left in a high-temperature oven. By using a low oven temperature, I can safely thaw my butter without worrying about it melting too much.

The Cold Water Bath Method for Rapid Butter Defrosting

I love using the cold water bath method to quickly defrost butter because it has several benefits.

First, it’s a time-saving technique that allows me to have soft and ready-to-use butter in just a few minutes.

Second, it’s a proper way to defrost butter as it helps maintain its texture and flavor without compromising its quality.

Lastly, this method is simple and convenient, making it a go-to technique for busy individuals who need softened butter on demand.

Cold Water Method Benefits

To defrost butter quickly, you can place it in a sealed plastic bag and submerge it in cold water. This method softens the butter without melting it completely. It offers several benefits for defrosting butter.

  • It is a quick and efficient way to soften butter, especially for baking or cooking purposes.
  • The cold water helps maintain the butter’s texture and prevents it from becoming too runny or melted.
  • This method is easy to do and requires minimal preparation.

However, there are some disadvantages to using the cold water method. It may not be suitable for defrosting large quantities of butter as it can be time-consuming. Additionally, you need to monitor the water temperature to ensure it remains cold enough but not too cold to freeze the butter.

If you’re looking for alternative methods, there are a few options to consider. One alternative is using the microwave, but you need to be careful not to overheat or melt the butter. Another option is letting the butter sit at room temperature, but this method takes longer. Ultimately, choose a method that suits your needs and time constraints.

Now, let’s move on to the next section where I will introduce a time-saving defrosting technique.

Time-Saving Defrosting Technique

Now that we’ve explored the benefits of the cold water method, let’s dive into some time-saving defrosting techniques and hacks.

When it comes to defrosting butter quickly, there are a few tricks that can save you precious minutes in the kitchen. One technique is to use the microwave. Simply place the wrapped butter in a microwave-safe dish and defrost it using the microwave’s low power setting in short bursts, checking and flipping it frequently to ensure even defrosting.

Another hack is to grate frozen butter. By grating the butter straight from the freezer, you can easily incorporate it into recipes without having to wait for it to soften.

These time-saving techniques and defrosting hacks will help you whip up delicious dishes in no time.

Proper Butter Defrosting

By grating frozen butter, you can easily incorporate it into recipes without waiting for it to soften, saving precious time in the kitchen. This technique allows you to quickly add cold butter to your doughs or batters, resulting in flaky pastries and tender cakes.

Here are some butter defrosting tips to ensure you do it safely:

  • Grate the frozen butter using a box grater or a food processor.
  • Sprinkle the grated butter directly onto the dry ingredients.
  • Gently incorporate the butter into the mixture until it resembles coarse crumbs.

These simple steps will give you perfectly softened butter in no time.

However, if you’re in a hurry and need to defrost butter quickly, there are some pro tips for safely defrosting butter in a hurry that you should know about.

Pro Tips for Safely Defrosting Butter in a Hurry

If you’re in a hurry, there are some pro tips to safely defrost butter quickly.

One method is to use the microwave. Start by placing the butter in a microwave-safe bowl and covering it with a microwave-safe lid or plastic wrap. Set the microwave to the defrost setting or use 30-second intervals on low power. Check the butter frequently to avoid melting it.

Another option is to grate the frozen butter. This increases the surface area and helps it defrost faster.

You can also try placing the butter in a sealable plastic bag and submerging it in warm water. Make sure the water is not too hot to prevent melting.

With these pro tips, you can safely defrost butter in a hurry.

Frequently Asked Questions

Can I Use the Same Methods to Defrost Margarine or Other Dairy Products?

Yes, you can use the same methods to defrost margarine or other dairy products. However, it’s important to consider the effects of using different defrosting methods on the quality of dairy products.

Can I Leave the Butter on the Kitchen Counter to Defrost Naturally?

Sure, you can leave butter on the kitchen counter to defrost naturally, but it can take a while. Depending on the temperature, it can take anywhere from 1-4 hours.

Can I Use a Hairdryer to Defrost Butter Quickly?

Using hot water to defrost butter quickly can affect its texture. I wouldn’t recommend using a hairdryer as it may heat unevenly. Instead, try placing the butter in a sealed plastic bag and submerging it in warm water for faster thawing.

Can I Use the Microwave to Defrost Butter if It’s Still in Its Paper Wrapper?

Yes, you can use the microwave to quickly defrost butter, even if it’s still in its paper wrapper. Just make sure to use the defrost setting and check it frequently to prevent melting.

Can I Refreeze Butter After It Has Been Defrosted?

Yes, you can refreeze butter after it’s been defrosted. However, it’s best to use it immediately to maintain quality. If you need to quickly defrost butter, try using the microwave or submerging it in warm water.

Conclusion

In conclusion, defrosting butter quickly is essential for those moments when time is of the essence in the kitchen. Understanding the science behind butter freezing allows us to employ the best methods for defrosting.

Whether it’s using the microwave, oven, or a cold water bath, these techniques will help you thaw out your butter in no time.

So next time you’re in a hurry, don’t let frozen butter slow you down. With these tips, you’ll be spreading soft, creamy goodness like a hot knife through butter.

Continue Reading

Household Hacks

How to Melt Butter on Stove

Published

on

By

An image showcasing a stainless steel saucepan placed on a gas stove burner set to medium-low heat

I’ve always loved the rich, creamy taste of melted butter. It adds a delicious flavor to so many dishes. However, I used to struggle with getting it just right on the stove. The heat would often be too high, resulting in burnt or unevenly melted butter. That’s why I’m here to share my tried-and-true method for melting butter on low heat.

By using low heat, you can slowly melt the butter without risking burning it. This gentle process helps to maintain the butter’s smooth texture and prevent any unwanted browning. To start, gather your ingredients and tools. All you’ll need is a stove, a pan, and of course, the butter.

Once you have everything ready, it’s time to begin. Place the pan on the stove over low heat. This will ensure that the butter melts slowly and evenly. Next, add the desired amount of butter to the pan. It’s important to use the correct amount for your recipe, so be sure to measure it out accurately.

As the butter starts to melt, you may notice some foam forming on the surface. This is normal and can be skimmed off if desired. Gently stir the butter occasionally to help it melt evenly. Be patient and resist the temptation to turn up the heat. Slow and steady wins the race when it comes to melting butter.

Once the butter is completely melted, remove it from the heat. It should be smooth and creamy, ready to be used in your favorite recipes. Whether you’re making a batch of cookies, sautéing vegetables, or drizzling it over popcorn, your melted butter will be perfect every time.

So, grab your stove and pan, and let’s get started on this delicious journey together. Follow these simple steps, and you’ll be able to achieve perfectly melted butter that will elevate your dishes to a whole new level. Enjoy!

Key Takeaways

  • Select a saucepan suitable for the amount of butter and ensure all ingredients and tools are ready before starting.
  • Use a non-stick pan with high sides and a lid to prevent splattering and ensure the pan is clean and dry.
  • Cut the butter into smaller chunks for even and faster melting, and use time-saving techniques like grating or rolling pin methods.
  • Stir constantly to achieve even melting and distribution of flavor, and incorporate air for a lighter and fluffier texture.

Gathering the Ingredients and Tools

First, you’ll need to gather the butter, a saucepan, and a stove. Time management is crucial when melting butter on the stove. To ensure a smooth and efficient process, it’s important to have all the necessary ingredients and tools ready before you begin.

Start by selecting a saucepan that is suitable for the amount of butter you wish to melt. A small saucepan works well for smaller quantities, while a larger one is better for larger amounts. Next, measure the desired amount of butter and place it in the saucepan. It’s important to cut the butter into smaller chunks to ensure even and faster melting.

Place the saucepan on a stove burner, set the heat to low, and allow the butter to melt slowly. By following these melting techniques and managing your time effectively, you’ll have perfectly melted butter for your culinary creations.

Preparing the Stove and Pan

Before you start, make sure the stove and pan are properly prepared.

To prevent butter from splattering, choose a pan with high sides and a lid. Non-stick pans are great because they make it easier to melt the butter without sticking.

Before heating the pan, ensure it is clean and dry. Moisture can cause the butter to splatter when it comes in contact with the hot surface.

Set the stove to low or medium heat to slowly melt the butter without overheating it. This will prevent unwanted splattering and ensure a smooth melting process.

Cutting the Butter Into Even Pieces

When it comes to cutting butter into even pieces, it’s not just about aesthetics, but also about achieving consistent results in your cooking. Evenness is crucial because it allows the butter to melt evenly and distribute its flavor and richness throughout your dish.

To save time and effort, I find it helpful to use time-saving techniques like the ‘grating’ method or the ‘rolling pin’ method, which help create uniform butter pieces quickly and efficiently.

Importance of Evenness

To ensure your melted butter is smooth and consistent, make sure you keep stirring it constantly on the stove. This is crucial for achieving an even melting process and a smooth texture. Here’s why it’s important:

  1. Uniform heat distribution: Stirring the butter prevents hot spots from forming, ensuring that it melts evenly throughout. This helps avoid any burnt or unevenly melted areas.

  2. Incorporation of air: Constant stirring helps incorporate air into the butter, resulting in a lighter and fluffier texture once melted. This is especially important for recipes that require a delicate and airy consistency.

  3. Homogeneous mixture: By stirring the butter continuously, you ensure that any solids or fat separation is evenly distributed, creating a smooth and cohesive texture in the final product.

Time-Saving Techniques

If you’re looking to save time in the kitchen, try using a microwave-safe bowl to melt your butter instead. This is one of the time-saving tips I always rely on when I’m in a hurry.

Simply place the desired amount of butter in the bowl and microwave it in short bursts, stirring in between, until it’s completely melted. This method is quick and efficient, allowing you to move on with your cooking or baking without wasting precious minutes.

However, if you prefer alternative melting methods, melting butter on low heat is another option worth considering. It requires a bit more patience, as you’ll need to constantly stir the butter over low heat until it melts slowly and evenly.

Melting Butter on Low Heat

When it comes to melting butter on the stove, achieving the optimal heat level is crucial. Too high of a heat can cause the butter to burn, resulting in a bitter taste and potentially ruining your dish.

Optimal Heat Level

The optimal heat level for melting butter on the stove is medium-low. This ensures that the butter melts slowly and evenly, preventing it from burning or losing its flavor. When melting butter on medium-low heat, here are three things to keep in mind:

  1. A small saucepan: Use a small saucepan to melt the butter. This allows for better control over the heat and prevents the butter from spreading too thin.

  2. Gentle bubbling: As the butter melts, it will start to bubble gently. This is normal and indicates that the butter is heating at the right temperature.

  3. Stirring occasionally: While the butter melts, stir it occasionally with a wooden spoon. This helps distribute the heat evenly and prevents any hot spots.

By following these guidelines, you can achieve the optimal melting time for butter and maintain its delicious flavor.

Now, let’s move on to the next section where we’ll discuss how to prevent butter from burning.

Prevent Butter Burning

Now that we know the optimal heat level to melt butter on the stove, let’s discuss how to prevent it from burning.

It’s crucial to avoid butter browning, as it can greatly affect the taste and quality of your dish. To prevent splattering and butter browning, start by using a heavy-bottomed pan. The thickness of the pan helps distribute heat evenly and reduces the risk of hot spots.

Next, melt the butter over low to medium heat, stirring constantly with a heat-resistant spatula. This ensures that the butter is melted gradually and prevents it from overheating.

Additionally, you can add a splash of water to the pan before melting the butter. The water creates a barrier between the butter and the hot pan, preventing direct contact and reducing the chances of browning.

Time and Consistency

To achieve the desired consistency, it’s important to monitor the time while melting butter on the stovetop. Here are three key factors to consider:

  1. Control the heat: Start by melting the butter over low heat to prevent it from burning. Gradually increase the heat if needed, but be cautious not to overdo it.

  2. Stir constantly: Continuously stir the butter while it melts to ensure even heat distribution and prevent any parts from burning. This will result in a smooth and creamy consistency.

  3. Be patient: Melting butter may take some time, but it’s worth it. Rushing the process can lead to uneven melting or burnt butter, which can ruin the flavor and texture.

Saving energy: To conserve energy, consider alternative melting methods such as using a microwave or a double boiler. These methods are quicker and require less heat, resulting in reduced energy consumption.

Stirring the Butter to Ensure Even Melting

Start by gently stirring the butter to ensure it melts evenly. This step is crucial because evenness is of utmost importance when melting butter on the stove. When the butter is heated, there can be pockets of unmelted butter, which can affect the outcome of your recipe.

By stirring the butter, you help distribute the heat evenly and promote uniform melting. This ensures that every part of the butter melts at the same rate, saving you time and preventing any inconsistencies in your dish.

Additionally, stirring the butter helps prevent it from burning or sticking to the pan, allowing it to melt smoothly and effortlessly. So, take a few moments to stir that butter, and you’ll be rewarded with perfectly melted goodness every time.

Monitoring the Butter’s Temperature

Make sure you’re keeping an eye on the temperature of that creamy goodness as it heats up on the stovetop. Monitoring the temperature is crucial in maintaining consistency and preventing the butter from burning or becoming too runny.

Here are three important things to consider while monitoring the temperature:

  1. Use a reliable kitchen thermometer: This will allow you to accurately measure the temperature of the butter as it melts. Ensure that the thermometer is inserted into the thickest part of the butter to get an accurate reading.

  2. Adjust the heat: As the butter begins to melt, you may need to adjust the heat to maintain a steady temperature. Lower the heat if the butter starts to bubble too vigorously or increase it slightly if the melting process is slow.

  3. Stir frequently: Stirring the butter will help distribute the heat evenly and prevent any hotspots. Make sure to scrape the bottom and sides of the pan to ensure thorough melting.

Removing the Melted Butter From the Stove

Once the butter has reached the desired temperature, it’s time for you to carefully remove it from the stove. To do this, make sure you have a heat-resistant pot holder or oven mitt on hand to protect yourself from any possible burns.

Gently grasp the handle of the pot or pan containing the melted butter and lift it off the heat source. Place it on a heat-resistant surface, such as a trivet or a cooling rack. Be cautious not to tilt the pot too much, as this can cause the hot butter to spill and potentially stain your clothes.

If any butter does spill, quickly attend to it by blotting the area with a clean cloth or paper towel. Avoid rubbing or spreading the butter, as this may drive it deeper into the fabric.

Now that the butter is safely off the stove, let’s move on to the next step: storing and using melted butter.

Storing and Using Melted Butter

Now that you’ve safely removed the melted butter from the stove, let’s discuss how to store and utilize it.

Storing melted butter properly is essential to maintain its freshness and quality. Here are three techniques to store and three alternative uses for melted butter:

  1. Storing Techniques:

    • Transfer the melted butter into an airtight container and refrigerate it. It can last for up to two weeks when stored correctly.
    • Pour the melted butter into ice cube trays and freeze. Once frozen, transfer the butter cubes into a freezer bag. This method allows you to conveniently portion out the butter as needed.
    • If you don’t plan to use the melted butter within a few days, you can also can it using a pressure canner. This method provides long-term storage.
  2. Alternative Uses:

    • Melted butter can be brushed onto bread or pastries before baking, giving them a golden and flavorful crust.
    • It can be used as a base for homemade sauces and gravies, adding richness and depth of flavor.
    • Melted butter can be drizzled over steamed vegetables, enhancing their taste and adding a touch of indulgence.

Frequently Asked Questions

How Do I Know When the Butter Is Fully Melted?

When melting butter on the stove, it’s important to know when it’s fully melted. Look for a smooth, liquid consistency with no solid bits remaining. This ensures it’s ready for baking or any other use.

Can I Use Margarine Instead of Butter?

I prefer using butter over margarine when baking because it adds a rich flavor and helps create a tender texture. While margarine can be a healthier alternative, it may not yield the same results in terms of taste and texture.

What Is the Best Type of Pan to Use for Melting Butter?

The best type of pan for melting butter is a non-stick pan. It allows for even heat distribution and prevents the butter from sticking. To melt butter, simply place it in the pan and heat over low to medium heat until fully melted.

Can I Melt Butter in the Microwave Instead of on the Stove?

Yes, you can melt butter in the microwave instead of on the stove. The microwave is quicker, but it can be harder to control the temperature. Stove melting gives you more control, but takes longer.

How Long Can Melted Butter Be Stored Before It Goes Bad?

Melted butter can be stored for about two weeks in the refrigerator. Look for signs of spoiled butter such as a rancid smell, mold, or an off taste. Proper storage can help maintain its freshness.

Conclusion

In conclusion, melting butter on the stove is a simple and efficient way to have smooth, melted butter ready for your culinary creations. By following the steps outlined in this article, you can ensure that your butter melts evenly and maintains its flavor.

While some may argue that using a microwave is quicker, melting butter on the stove allows for better control over the temperature and prevents the butter from overheating.

So why not give it a try and elevate your cooking game with perfectly melted butter?

Continue Reading

Trending