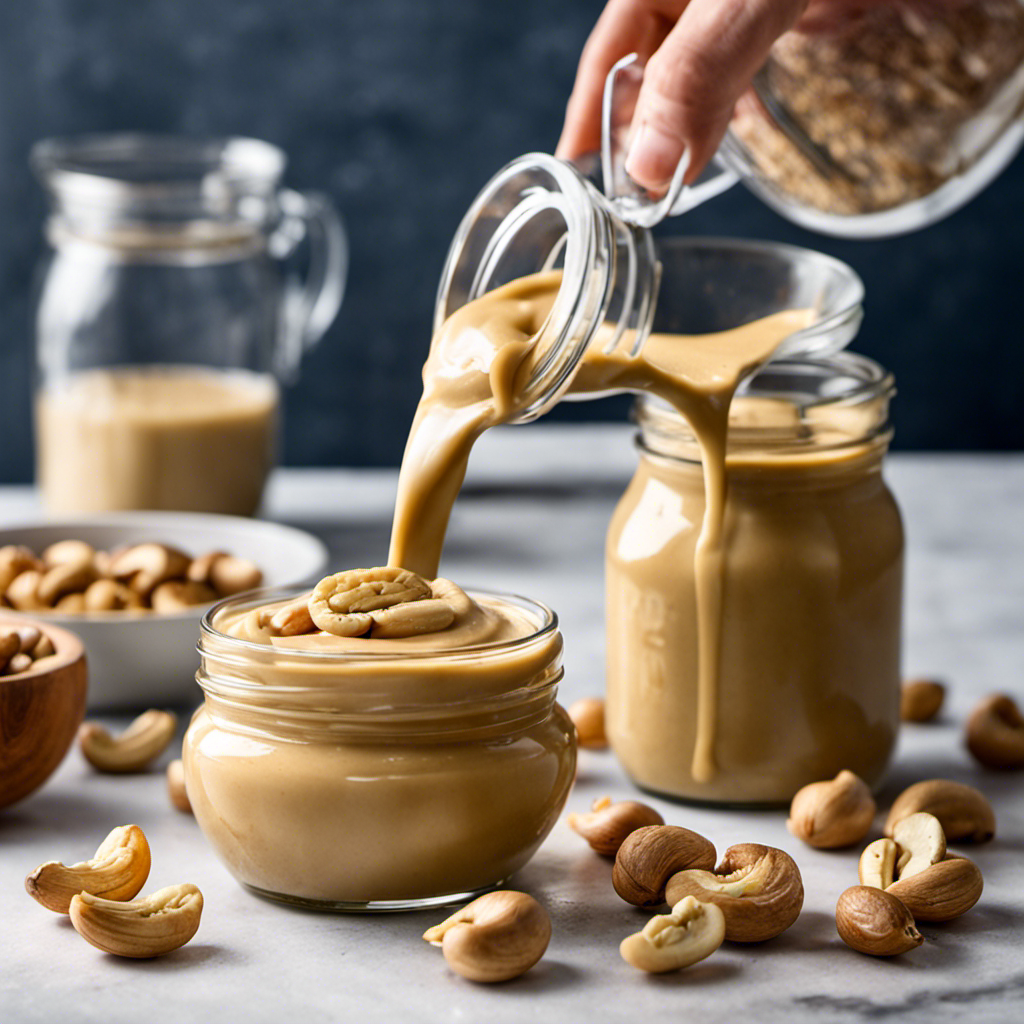
Recipes & Culinary Uses
How Do You Make Cashew Butter

Alright folks, let’s dive into the creamy world of homemade cashew butter! If you’re nuts about spreads and looking for a healthier alternative, this article is just the ticket.
I’ll guide you through the simple steps of transforming those humble cashews into a velvety, nutty delight. So, grab your blender and get ready to spread some deliciousness on your next slice of toast.
Trust me, once you taste this homemade goodness, store-bought won’t stand a chance. Let’s get cracking!
Key Takeaways
- Soaking cashews is a crucial step in making cashew butter.
- Soaking helps to soften cashews and enhance their creaminess.
- Soaking improves the texture, flavor, and digestibility of cashews.
- Blending techniques and flavor additions can further enhance the quality of cashew butter.
Gathering the Ingredients
To make cashew butter, you’ll need to gather all the necessary ingredients. Cashew butter is a delicious and nutritious spread that can be used in a variety of ways.
Before we get started, it’s important to note that soaking the cashews is a crucial step in the process. Soaking helps to soften the cashews and makes them easier to blend into a smooth and creamy butter. You can use different soaking techniques, such as overnight soaking or a quick soak method.
Additionally, you have the option to experiment with different nut butter variations by adding ingredients like honey, cinnamon, or cocoa powder.
Now that we have gathered our ingredients, let’s move on to the next step of soaking the cashews.
Soaking the Cashews
Soaking cashews is an important step in making cashew butter as it helps to soften the nuts and enhance their creaminess. The recommended soaking time for cashews is usually around 4-8 hours, although some sources suggest soaking them overnight for maximum results.
Soaking cashews not only improves their texture but also increases their digestibility and nutrient availability, making them easier to blend and more beneficial for our bodies.
Importance of Soaking
Soaked cashews are essential for making creamy cashew butter. When cashews are soaked, they become softer and easier to blend into a smooth and creamy texture. Here are four reasons why soaking cashews is important for making delicious cashew butter:
-
Improved texture: Soaking cashews helps to soften them, making them easier to blend into a creamy consistency. This results in a smoother and more spreadable cashew butter.
-
Enhanced flavor: Soaking cashews allows them to absorb water, which can help to mellow out any bitter or astringent flavors. This leads to a more balanced and enjoyable taste in the finished cashew butter.
-
Increased digestibility: Soaking cashews can help to break down phytic acid, which is a natural compound that can inhibit nutrient absorption. This makes the nutrients in cashews more bioavailable and easier to digest.
-
Versatility: Soaked cashews can also be used to make alternative nut butters, such as almond butter or hazelnut butter. Soaking techniques can be applied to various nuts, expanding the possibilities for homemade nut butter creations.
Overall, soaking cashews is a crucial step in making velvety cashew butter and unlocks a world of flavor and nutrition.
Soaking Time Recommendations
For best results, it’s recommended to let the cashews soak for at least four hours before blending them into a creamy consistency. Soaking the cashews helps soften them, making them easier to blend and resulting in a smoother butter.
This duration allows the cashews to absorb enough water, which helps break down the enzymes and phytic acid present in the nuts. However, if you’re short on time, you can use alternative soaking methods.
One method is to soak the cashews in hot water for 30 minutes. This speeds up the softening process, but keep in mind that the flavor and texture may differ slightly.
Another option is to soak the cashews overnight. This extended soaking time will result in an even creamier butter.
Experiment with different soaking durations to find the consistency that suits your preference.
Benefits of Soaked Cashews
To get the most out of your cashews, it’s beneficial to let them absorb water and soften before blending. When cashews are soaked, they become easier to blend into a creamy butter. But the benefits of soaked cashews go beyond just texture. Here are four reasons why soaking your cashews is worth it:
-
Improved digestion: Soaking cashews helps break down phytic acid, which can interfere with nutrient absorption. This makes them easier to digest and allows your body to access their nutritional benefits more effectively.
-
Enhanced nutrient availability: Soaking cashews can increase the bioavailability of nutrients like vitamins, minerals, and antioxidants. This means that your body can better absorb and utilize these beneficial compounds.
-
Reduced phytates: Phytates are natural compounds found in cashews that can bind to minerals and inhibit their absorption. Soaking cashews can help reduce the levels of phytates, ensuring that you get the most out of the minerals present in these nuts.
-
Creamier texture: Soaked cashews blend into a smoother, creamier texture, making them ideal for recipes that require a velvety consistency. Whether you’re making cashew butter, sauces, or desserts, soaking the cashews beforehand will result in a more luxurious end product.
Draining and Drying the Cashews
When making cashew butter, it’s crucial to properly drain and dry the soaked cashews before blending them. This ensures that the cashews are not too moist, which can affect the texture and consistency of the butter.
Optimal drying techniques, such as air drying or using a dehydrator, help remove excess moisture and enhance the flavor and shelf life of the cashew butter.
Optimal Drying Techniques
Properly drying the cashews is crucial for achieving the best texture in your cashew butter. To ensure optimal drying, follow these techniques:
-
Set the oven to a low temperature: Preheat your oven to 150°F (65°C). This gentle heat will gradually remove the moisture from the cashews without overheating them.
-
Spread cashews evenly on a baking sheet: Arrange the cashews in a single layer on a baking sheet. This allows for even air circulation and promotes uniform drying.
-
Monitor the drying time: The drying time can vary depending on the size and moisture content of the cashews. Typically, it takes around 2-4 hours for cashews to dry thoroughly.
-
Check for dryness: To check if the cashews are properly dried, they should be crisp and slightly golden in color. They should break easily when pressed between your fingers.
Importance of Thorough Draining?
After drying the cashews, the next step in making cashew butter is thorough draining. This step is crucial for achieving the desired consistency of the cashew butter.
When cashews are drained properly, excess moisture is removed, allowing the nuts to blend into a smooth and creamy butter. To drain the cashews, I usually place them on a clean kitchen towel and gently pat them dry. This helps to remove any remaining moisture that could affect the texture of the final product.
Once the cashews are drained, they are ready for the next step: blending.
Blending the Cashews
To blend the cashews, you’ll want to add a small amount of oil to help them process smoothly. This step is crucial in achieving a creamy and spreadable cashew butter.
Here are some key tips for blending cashews effectively:
-
Choose the right blender: Opt for a high-powered blender that can handle the tough texture of cashews. A blender with a strong motor and sharp blades will ensure a smooth and consistent blend.
-
Soak the cashews: Soaking cashews overnight or for at least four hours softens them, making them easier to blend. This step also helps remove any bitterness.
-
Add oil gradually: Start by adding a tablespoon of oil, such as coconut or vegetable oil, to the cashews. This will assist in the blending process and enhance the creamy texture.
-
Blend in intervals: Blend the cashews in short bursts, pausing in between to scrape down the sides of the blender jar. This will ensure an even blend and prevent overheating.
By following these blending techniques, you’ll be on your way to achieving a velvety-smooth cashew butter.
Now, let’s move on to the next step of adding flavor and texture to your creation.
Adding Flavor and Texture
Now that you’ve blended the cashews, it’s time to enhance the flavor and texture of your creation.
When it comes to flavor options for cashew butter, the possibilities are endless. You can keep it simple by adding a pinch of salt for a savory taste or go for a sweeter option by mixing in some honey or maple syrup. For those who love a little kick, a dash of cinnamon or a sprinkle of cocoa powder can add a delicious twist.
If you’re feeling adventurous, try experimenting with different textures. You can achieve a chunkier consistency by adding chopped nuts or dried fruits. Alternatively, for a smoother texture, try incorporating a splash of coconut oil or almond milk.
Don’t be afraid to get creative and personalize your cashew butter to suit your taste preferences.
Storing and Using Cashew Butter
For optimal freshness, remember to store your homemade cashew butter in an airtight container in the refrigerator. This will help extend its shelf life and prevent it from going rancid.
Here are some tips on storing and using cashew butter:
-
Refrigerate: Cashew butter should always be stored in the refrigerator to maintain its quality and prevent spoilage. The cool temperature helps to preserve its flavor and texture.
-
Airtight container: Use a container that seals tightly to keep out moisture and air. This will prevent the cashew butter from becoming dry or developing a stale taste.
-
Shelf life: Cashew butter can typically be stored in the refrigerator for up to 2-3 months. However, it’s best to check for any signs of spoilage, such as an off smell or mold, before using it.
-
Recipes: Cashew butter is a versatile ingredient that can be used in a variety of recipes, from smoothies and dressings to baked goods and sauces. Experiment with different flavors and combinations to enhance your dishes.
Tips and Variations for Making Cashew Butter
When making cashew butter, it’s important to experiment with different ingredients and flavors to create unique variations. One of my favorite variations is adding a touch of cinnamon and honey to the cashews before blending them into a smooth butter. This adds a warm and sweet flavor that pairs perfectly with toast or pancakes.
Another delicious variation is adding a tablespoon of cocoa powder and a pinch of sea salt to create a rich and decadent chocolate cashew butter. This is perfect for spreading on fruit or as a dip for pretzels.
Cashew butter can also be used in savory dishes like stir-fries or sauces, adding a creamy and nutty taste. With so many possibilities, cashew butter is a versatile ingredient that can be enjoyed in both sweet and savory dishes.
Frequently Asked Questions
Are There Any Alternatives to Cashews That Can Be Used to Make Cashew Butter?
There are alternatives to cashews that can be used to make nut butter, such as almonds or peanuts. These nuts offer different flavors and nutritional benefits, making them a versatile choice for homemade nut butter.
How Long Does It Take for Cashews to Soak Before Making Cashew Butter?
Well, I gotta say, soaking cashews for cashew butter is no quick process. It takes a good 4-6 hours to get those babies nice and soft. But trust me, the creamy goodness is worth the wait!
Can I Use Salted Cashews to Make Cashew Butter?
Yes, you can use salted cashews to make cashew butter. However, keep in mind that the taste of the cashew butter will be different compared to using unsalted cashews.
Is It Necessary to Roast the Cashews Before Blending Them?
Roasting vs. raw: which method is better for making cashew butter? Is it possible to make cashew butter without soaking the cashews? Roasting enhances flavor and texture, but raw preserves more nutrients. Soaking aids in blending.
Can I Add Other Nuts or Seeds to the Cashew Butter for Added Flavor?
Yes, you can definitely add other nuts or seeds to the cashew butter for added flavor. Some popular alternatives include almonds, peanuts, and sunflower seeds. It’s a great way to experiment and customize your cashew butter.
Conclusion
In conclusion, making cashew butter is a simple and delicious process that anyone can do. By following the steps outlined in this article, you can create a creamy and flavorful spread that will enhance your meals and snacks.
While some may argue that buying pre-made cashew butter is more convenient, the satisfaction and control you gain from making it yourself is worth the extra effort. Plus, homemade cashew butter allows you to experiment with different flavors and textures, making it a truly personalized experience.
So go ahead, give it a try and indulge in the richness of homemade cashew butter.
Sunny’s articles radiate enthusiasm, much like her sunny disposition. As our resident “Butter Geek”, she delves deep into the latest butter trends, ensuring our readers are always in the know. Beyond her writing, Sunny’s passion lies in exploring vegan butter alternatives and hosting butter-tasting soirées.
Recipes & Culinary Uses
How to Make Butter Sage Sauce

So, you want to know how to make the most delectable butter sage sauce? Well, you’re in luck! This article will guide you through the steps, giving you all the juicy details.
From gathering the ingredients to simmering and thickening the sauce, you’ll become a master in no time.
And let’s not forget the mouthwatering aroma of sage leaves that will fill your kitchen.
Get ready to impress your taste buds and your dinner guests with this irresistible sauce.
Let’s dive in!
Key Takeaways
- Sage leaves add aroma and taste to dishes and have health benefits.
- Butter is the traditional base for sage sauce, but alternatives like olive oil or coconut oil can be used.
- Fresh sage leaves enhance the flavor of the sauce, but dried sage can be used as a substitute.
- The sauce can be thickened using roux, cornstarch slurry, reduction, cream, or pureed vegetables.
Ingredients Needed for Butter Sage Sauce
First, you’ll need to gather all the ingredients for making butter sage sauce.
Sage, a versatile herb with a rich history, not only adds a delightful aroma and taste to your dishes but also offers numerous health benefits. Sage leaf benefits include improving digestion, boosting memory, and reducing inflammation.
Besides its medicinal properties, sage has various culinary uses. It is commonly used in stuffing for poultry, added to soups and stews, and even infused in teas. However, in this recipe, we will be using sage to create a creamy and aromatic butter sage sauce.
This sauce pairs perfectly with pasta, chicken, or roasted vegetables, adding a burst of flavor to any dish.
Now that you understand the benefits and uses of sage, let’s move on to step 1: gathering the necessary ingredients.
Step 1: Gathering the Necessary Ingredients
To start, you’ll need all the required ingredients for this delicious sage butter sauce.
Firstly, gather fresh sage leaves, as they are the star of this sauce, enhancing its flavor with their earthy and slightly minty taste. If you don’t have fresh sage, dried sage can be used as a substitute, although the flavor won’t be as vibrant.
Next, you’ll need butter, the traditional base for this sauce. However, if you’re looking for an alternative, you can try using olive oil or coconut oil instead. Both options will provide a different taste profile, but they can still create a rich and flavorful sauce.
Don’t forget to have some garlic, lemon juice, salt, and pepper on hand as well, as they will add depth and balance to your sage butter sauce.
Step 2: Preparing the Sage Leaves
Are you ready to take your cooking skills to the next level?
In this discussion, we will explore the art of preparing sage leaves and how to enhance the flavor in your dishes using this aromatic herb.
Discover the best techniques for handling sage leaves, from washing and drying to chopping or tearing, to ensure that you get the most out of its unique taste and fragrance.
Get ready to impress your taste buds and elevate your culinary creations with the wonderful world of sage leaf preparation.
Sage Leaf Preparation Techniques
When making butter sage sauce, you can start by gently rubbing the sage leaves between your palms to release their aroma and flavor. This simple technique helps to awaken the full potential of the sage and infuse it into the sauce.
But before you even begin this step, it’s important to know about different types of sage leaves and how to store them properly. Here are some key points to keep in mind:
-
Fresh sage leaves: These are the most commonly used in cooking. They have a vibrant green color and a strong, earthy flavor.
-
Dried sage leaves: These are great for long-term storage and have a more intense flavor. They can be easily crumbled and sprinkled into the sauce.
-
Freezing sage leaves: If you have an abundance of sage, freezing is a great way to preserve its freshness. Simply place the leaves in an airtight container or freezer bag and store in the freezer for up to six months.
-
Drying sage leaves: Another method of storage is drying the leaves. Hang them in a cool, dry place for about two weeks until they become brittle. Then, store them in an airtight container.
-
Infused sage oil: To make sage-infused oil, gently heat olive oil in a pan and add fresh sage leaves. Let it simmer for a few minutes, then strain out the leaves and store the infused oil in a glass bottle.
Enhancing Flavor With Sage
If you’re looking to enhance the flavor of your dishes, incorporating sage into your recipes can add a unique and aromatic twist. Sage is a versatile herb that not only brings a delightful earthy flavor to your meals but also offers numerous health benefits. Rich in antioxidants, sage has been used for centuries for its medicinal properties, including improving digestion and boosting cognitive function. Pairing sage with other herbs can elevate the taste profile of your dishes even further. Here are some delicious herb combinations to try:
Herb Combination | Flavor Profile |
---|---|
Sage + Rosemary | Woody and fragrant |
Sage + Thyme | Earthy and savory |
Sage + Basil | Fresh and aromatic |
Sage + Oregano | Bold and zesty |
Experiment with these combinations in your favorite recipes to create mouthwatering dishes that will leave your taste buds satisfied. Enjoy the wonderful flavor and health benefits that sage brings to your culinary creations.
Step 3: Making the Butter Base for the Sauce
Now that you’ve prepared the sage leaves, it’s time to move on to making the butter base for your sauce. In this discussion, we’ll explore different techniques for melting butter, as well as exciting flavor additions that can elevate the taste of your sauce.
But what if you’re looking for a butter alternative? Don’t worry, we’ll also delve into some substitutes that can still give you that creamy richness.
Let’s dive into the world of butter and its alternatives as we continue on our culinary journey.
Butter Melting Techniques
Melt the butter slowly over low heat to avoid burning it. This step is crucial in achieving the perfect butter base for your sauce. Here are some tips to ensure your butter is melted to perfection:
- Use unsalted butter for better control of the seasoning.
- Clarify the butter before melting it to remove any impurities and achieve a smoother texture.
- Watch closely as the butter melts to prevent it from browning too quickly.
- Stir occasionally to distribute the heat evenly and prevent any hot spots.
- Once the butter has completely melted, remove it from the heat to prevent further browning.
Flavor Additions for Butter
To enhance the taste of your melted butter, try adding a sprinkle of garlic powder for a savory twist. This simple addition can take your butter to a whole new level of flavor.
Garlic powder is a versatile ingredient that adds a subtle yet delicious taste to any dish. When added to melted butter, it infuses the butter with a rich, garlicky aroma that will make your taste buds dance with joy.
Whether you’re using the butter as a dip for bread, a topping for vegetables, or a sauce for pasta, the addition of garlic powder will elevate the dish to new heights.
So next time you’re melting butter, don’t forget to reach for that bottle of garlic powder and give your taste buds a flavor-enhancing treat.
Happy cooking!
Alternative Butter Substitutes?
If you’re looking for an alternative to butter, there are a variety of substitutes available that can still add richness and flavor to your dishes. Whether you’re vegan, lactose intolerant, or simply looking for a healthier option, plant-based alternatives to butter are becoming increasingly popular.
Not only do these alternatives offer a similar creamy texture, but they also provide a range of health benefits. Here are five plant-based butter substitutes to consider:
-
Coconut oil: With its high smoke point and rich taste, coconut oil is a versatile substitute that can be used in both sweet and savory dishes.
-
Avocado: The creamy texture of avocado makes it an excellent substitute for butter in baking recipes.
-
Nut butters: Almond, cashew, and peanut butters are all delicious options that add a nutty flavor to your dishes.
-
Olive oil: A staple in Mediterranean cuisine, olive oil is a heart-healthy butter substitute that adds a subtle fruity taste.
-
Applesauce: For a low-fat alternative, applesauce can be used in baking recipes to add moisture and a touch of sweetness.
Step 4: Adding the Sage Leaves to the Sauce
Now you’re ready to toss in the sage leaves and let them infuse the sauce with their aromatic flavor. Sage is a versatile herb with a slightly earthy and peppery taste.
To ensure you have fresh sage leaves on hand whenever you need them, it’s important to properly store them. After picking or purchasing the sage leaves, gently wash and dry them thoroughly. Then, place them in a plastic bag or airtight container and store them in the refrigerator. This will help to maintain their freshness and flavor for up to a week.
If you don’t have sage leaves on hand, there are a few alternatives you can use. Rosemary, thyme, or marjoram can be substituted for sage in most recipes, providing a similar aromatic and savory taste.
Step 5: Simmering and Thickening the Sauce
Once the sauce has reached a gentle simmer, you’ll need to let it cook uncovered for about 20 minutes, allowing the flavors to meld and the sauce to thicken. Simmering is a crucial step in bringing out the rich and vibrant flavors of your butter sage sauce.
Here are some simmering techniques to ensure a perfect result:
- Keep the heat low and steady to maintain a gentle simmer.
- Stir occasionally to prevent the sauce from sticking to the bottom of the pan.
- Use a wide and shallow pan for faster evaporation and better flavor concentration.
- Adjust the heat as needed to maintain the desired simmering temperature.
- Be patient and let the sauce simmer slowly to allow the flavors to develop fully.
To further enhance the texture of your sauce, you may consider using thickening agents such as:
- Roux (a mixture of flour and fat)
- Cornstarch slurry (mixing cornstarch with water before adding it to the sauce)
- Reduction (simmering the sauce for longer to evaporate excess liquid)
- Cream or cheese (for a creamy and indulgent sauce)
- Pureed vegetables (to add thickness and a hint of sweetness)
Step 6: Serving and Storing the Butter Sage Sauce
To serve and store the lusciously thick butter sage sauce, simply transfer it to an airtight container and refrigerate for up to 5 days.
When it comes to serving techniques, the options are endless. This velvety sauce pairs perfectly with roasted vegetables, grilled chicken, or even a simple pasta dish. Drizzle it over your favorite protein or use it as a dip for crusty bread. The rich and savory flavors of the butter and sage will elevate any dish to a whole new level of deliciousness.
As for sauce storage tips, make sure to use a container that seals tightly to prevent any air from getting in. This will help maintain the sauce’s freshness and flavor for the full 5 days.
Conclusion
In conclusion, making butter sage sauce is a breeze! By following these simple steps, you’ll have a velvety and aromatic sauce that will elevate any dish.
So, why not give it a whirl and take your cooking skills to the next level? Remember, practice makes perfect, and soon you’ll be able to whip up this sauce with your eyes closed.
So, don’t let the grass grow under your feet, get in the kitchen and start making this butter sage sauce that will knock your socks off!
Sunny’s articles radiate enthusiasm, much like her sunny disposition. As our resident “Butter Geek”, she delves deep into the latest butter trends, ensuring our readers are always in the know. Beyond her writing, Sunny’s passion lies in exploring vegan butter alternatives and hosting butter-tasting soirées.
Recipes & Culinary Uses
How to Make Butter Potatoes

I’ve got a foolproof recipe for the most divine butter potatoes you’ll ever taste. Trust me, this dish will have your taste buds dancing with delight.
In this article, I’ll walk you through the steps to create these delectable spuds from scratch. We’ll start by selecting the perfect potatoes and then move on to preparing and boiling them to perfection.
Then, we’ll whip up a luscious butter sauce that will take these potatoes to the next level.
So, let’s get started and elevate our potato game to new heights!
Key Takeaways
- Choose the right type of potato for the desired texture and taste of the dish.
- Boil the potatoes until they are easily pierced with a fork for soft and creamy butter potatoes.
- Experiment with different herbs and ingredients to create a flavorful butter sauce.
- Enhance the dining experience with toppings like sour cream, cheese, and fresh herbs, as well as table linens, candles, and fresh flowers.
Choosing the Right Potatoes
When making butter potatoes, it’s important to choose the right potatoes. The type of potato you select can greatly affect the taste and texture of your dish.
There are various potato cooking techniques that are suited for different types of potato dishes. For example, if you’re making mashed potatoes, you’ll want to choose a starchy potato like a Russet or Yukon Gold. These potatoes have a high starch content, which makes them perfect for creating a smooth and creamy texture when mashed.
On the other hand, if you’re making roasted potatoes, you may opt for a waxy potato like a red or fingerling potato. These potatoes hold their shape well during cooking and develop a crispy exterior.
Preparing the Potatoes
To prepare the potatoes, first, you’ll need to wash and peel them. Here’s how I like to do it:
-
Start by rinsing the potatoes under cold water to remove any dirt or debris. Use a brush if necessary to scrub the surface clean.
-
Next, grab a vegetable peeler and carefully remove the skin from each potato. Make sure to remove any blemishes or eyes as well.
-
Once the potatoes are peeled, you can choose how to cook them based on your desired creaminess level. Boiling is a popular method that results in a soft, creamy texture. Baking in the oven can give you a crispy exterior with a fluffy interior. And if you’re short on time, microwaving is a quick option that still yields a delicious dish.
Boiling the Potatoes
For a soft and creamy texture, you’ll want to boil the peeled potatoes. This is an essential step in making butter potatoes.
To start, fill a large pot with enough water to cover the potatoes. Add a pinch of salt to enhance the flavor. Place the pot over high heat and bring the water to a rolling boil.
Once the water is boiling, carefully add the peeled potatoes. Reduce the heat to medium-low and let the potatoes simmer gently. The cooking time will vary depending on the size of the potatoes, but it usually takes around 15-20 minutes.
To check if they’re done, pierce a potato with a fork. If it easily slides through, they’re ready. Drain the potatoes and proceed with the recipe.
Making the Butter Sauce
Once the potatoes are boiled, it’s time to whip up a smooth and flavorful butter sauce. This sauce is the perfect accompaniment to the tender and creamy potatoes, adding richness and a burst of flavor. Here are three variations on the traditional butter sauce that you can try:
-
Garlic Butter Sauce: Melt butter in a saucepan and add minced garlic. Cook until fragrant. This adds a delicious savory flavor to the sauce.
-
Herb Butter Sauce: Mix softened butter with chopped fresh herbs like parsley, thyme, and chives. This adds a refreshing and aromatic element to the sauce.
-
Lemon Butter Sauce: Combine melted butter with freshly squeezed lemon juice and zest. The tangy citrus flavor enhances the overall taste of the dish.
These alternative ingredients and variations on the butter sauce will take your butter potatoes to the next level.
Now, let’s move on to the next step of mashing the potatoes.
Mashing the Potatoes
When it comes to mashed potatoes, there are a few key points to consider: whether you prefer them creamy or chunky, which potato variety is the best, and if there are any alternatives to using butter.
Personally, I like my mashed potatoes to be creamy and smooth, but some people prefer a chunkier texture with bits of potato still intact.
As for the best potato variety, many chefs recommend using starchy potatoes like Russets for their fluffy texture, while others swear by waxy potatoes like Yukon Golds for their buttery flavor.
Lastly, if you’re looking for a butter alternative, you can try using olive oil, sour cream, or even Greek yogurt to add a different flavor profile to your mashed potatoes.
Creamy or Chunky
To achieve your desired texture, you can decide whether you want your butter potatoes to be creamy or chunky. Both options have their own unique qualities and can be enjoyed based on personal preference.
Here are three factors to consider when choosing between creamy and chunky butter potatoes:
-
Creaminess: If you prefer a smooth and velvety texture, opt for creamy butter potatoes. This style is achieved by thoroughly mashing the potatoes until they are free of lumps. The result is a silky consistency that melts in your mouth.
-
Chunkiness: On the other hand, if you enjoy a more rustic and textured dish, go for chunky butter potatoes. This involves mashing the potatoes just enough to break them down, leaving small chunks and bits of potato intact. The result is a more substantial and hearty side dish.
-
Buttery Flavor: Regardless of the texture you choose, both creamy and chunky butter potatoes offer a rich and buttery flavor. The addition of butter adds a luxurious taste that enhances the overall experience of the dish.
Ultimately, the decision between creamy and chunky butter potatoes comes down to personal preference. Whether you enjoy the smoothness of creamy potatoes or the texture of chunky potatoes, both options are sure to delight your taste buds with their buttery goodness.
Best Potato Variety
The best potato variety for creamy or chunky butter potatoes depends on personal preference. There are several potato varieties that work well for making butter potatoes, each with their own unique texture and flavor. Here is a comparison table of three popular potato varieties:
Potato Variety | Texture | Flavor |
---|---|---|
Yukon Gold | Creamy | Buttery |
Russet | Fluffy | Mild |
Red potatoes | Firm | Earthy |
Yukon Gold potatoes are known for their creamy texture and buttery flavor, making them a popular choice for creamy butter potatoes. Russet potatoes have a fluffy texture that works well for both creamy and chunky butter potatoes. Red potatoes have a firmer texture and earthy flavor, making them a great choice for chunky butter potatoes. Whichever variety you choose, cooking techniques such as boiling or roasting can enhance the flavor and texture of the potatoes. Using butter in your butter potatoes adds richness and a smooth mouthfeel. Now, let’s explore some butter alternatives.
Butter Alternatives?
One option for adding richness and a smooth mouthfeel to your creamy or chunky potatoes is to use butter alternatives. These alternatives not only provide a healthier option but also offer a wide range of flavor options.
Here are three butter alternatives that can elevate your potato dishes:
-
Olive oil: This heart-healthy option adds a subtle fruity flavor to your potatoes. It is rich in monounsaturated fats, which can help lower bad cholesterol levels and reduce the risk of heart disease.
-
Coconut oil: Known for its tropical aroma and flavor, coconut oil adds a unique twist to your potatoes. It contains medium-chain fatty acids that are metabolized differently by the body and can provide a quick source of energy.
-
Avocado: Mashed avocado adds a creamy texture and a mild, buttery taste to your potatoes. It is packed with healthy fats, fiber, and various nutrients, making it a nutritious choice.
Adding the Butter Sauce
Mixing the melted butter and herbs together until well combined is the key step to achieving a delicious butter sauce consistency for your potatoes. By ensuring that the butter and herbs are thoroughly mixed, you guarantee that the flavors are evenly distributed throughout the sauce. This step is crucial in creating a smooth and creamy texture that will coat the potatoes perfectly.
When it comes to flavor variations, there are countless options to explore. You can experiment with different herbs such as rosemary, thyme, or dill to add a unique twist to your butter sauce. Additionally, you can incorporate other ingredients like garlic, lemon zest, or Parmesan cheese for an extra burst of flavor. The possibilities are endless, and it’s up to your taste preferences to determine the perfect combination.
Serving and Enjoying
When it comes to enjoying a delicious dish, the way it is presented and served plays a crucial role.
In this discussion, I will be exploring some tasty serving suggestions that can elevate your dining experience.
Additionally, we will delve into the age-old debate of butter versus other toppings, weighing the pros and cons of each option.
Lastly, we will explore how small touches and enhancements can truly enhance the overall dining experience, making it a memorable and enjoyable occasion.
Tasty Serving Suggestions
To enhance the flavor of your butter potatoes, you can try topping them with sour cream and crispy bacon. Trust me, it takes them to a whole new level of deliciousness.
Here are three tasty side dish ideas that will make your butter potatoes the star of the meal:
-
Cheesy goodness: Sprinkle some shredded cheddar cheese over your butter potatoes and let it melt into gooey perfection. The combination of the creamy potatoes and the melted cheese is simply irresistible.
-
Herb-infused: Add a sprinkle of fresh herbs like chives or parsley to your butter potatoes for a burst of freshness. Not only does it add a pop of color, but the herbs also add a subtle complexity to the dish.
-
Garlic and Parmesan: For a bold and savory twist, drizzle some garlic-infused olive oil over your butter potatoes and sprinkle grated Parmesan cheese on top. The garlic and Parmesan complement the creamy potatoes perfectly, creating a mouthwatering combination.
Butter Vs Other Toppings
If you’re looking for alternative toppings, have you ever tried sprinkling some crispy breadcrumbs over your potatoes?
While butter is a classic and delicious choice for topping your butter potatoes, there are other options that can add a whole new level of flavor. One popular alternative is sour cream. Its tangy and creamy texture pairs perfectly with the buttery potatoes, creating a rich and indulgent combination.
On the other hand, if you’re a cheese lover, you can opt for grated cheese as a topping. The melted cheese adds a savory element and a gooey texture to the dish.
Whether you choose butter, sour cream, or cheese, these toppings will elevate your butter potatoes and make them even more enjoyable.
Now that we’ve explored the different toppings for butter potatoes, let’s move on to enhancing the dining experience.
Enhancing the Dining Experience
Enhancing the dining experience can be accomplished by trying out different seasonings and spices. Here are three ways to set the table and create a cozy ambiance:
-
Use table linens: Adding a tablecloth, placemats, and cloth napkins can instantly elevate the dining experience. Choose colors and patterns that complement your decor and create a warm and inviting atmosphere.
-
Utilize candles and dim lighting: Lighting plays a crucial role in setting the mood. Use candles or soft lighting to create a cozy ambiance. It not only adds warmth but also creates a romantic and intimate setting for your meal.
-
Incorporate fresh flowers or greenery: Adding a centerpiece of fresh flowers or some greenery can bring life to your table. It adds a touch of elegance and freshness, making the dining experience more enjoyable.
Frequently Asked Questions
How Many Types of Potatoes Are There to Choose From?
There are many types of potatoes to choose from, each with different cooking methods. When it comes to frying, the best varieties are Russet and Yukon Gold potatoes. They both have a high starch content, resulting in crispy and delicious fried potatoes.
Can I Use Any Type of Potato for This Recipe?
Can I use sweet potatoes instead? Are there any alternative methods for cooking the potatoes? Yes, you can use sweet potatoes for this recipe. As for alternative cooking methods, you could try roasting or mashing them.
How Long Should I Boil the Potatoes For?
I usually boil the potatoes for about 15-20 minutes until they’re fork-tender. However, if you’re looking for alternative cooking methods, you can also try roasting or microwaving them for a different texture and flavor.
Can I Substitute the Butter Sauce With a Different Sauce?
Yes, you can substitute the butter sauce with a different sauce. However, using butter sauce adds richness and flavor to the potatoes. Different sauce options include garlic aioli, sour cream, or even a tangy vinaigrette.
Can I Add Any Additional Ingredients to the Mashed Potatoes?
Sure, you can definitely add cheese to mashed potatoes for an extra creamy and flavorful twist. And if you prefer, you can use olive oil instead of butter for a healthier alternative.
Conclusion
Well, there you have it folks! Making butter potatoes may seem like a simple task, but it requires careful consideration and attention to detail.
From choosing the right potatoes to mashing them to perfection, every step is crucial in creating a delightful dish.
And let’s not forget the pièce de résistance – the butter sauce! This creamy concoction takes the potatoes to a whole new level of deliciousness.
So next time you’re in the mood for some comfort food, don’t settle for anything less than the best butter potatoes. Trust me, your taste buds will thank you.
From sneaky childhood butter licks to penning some of our most popular articles, Jamie’s journey with butter has been lifelong. His culinary background gives him a unique perspective, allowing him to craft mouthwatering articles that educate and tantalize equally. Jamie’s travel adventures revolve around finding the world’s best buttery treats when he isn’t writing.
Recipes & Culinary Uses
How to Make Butter Powder

I never thought I could transform butter into a fine, powdery form – until I discovered the secret technique.
Making butter powder opens up a world of culinary possibilities. With just a few simple ingredients and a step-by-step guide, you’ll be able to create this versatile ingredient right in your own kitchen.
So, grab your apron and get ready to embark on a scientific journey that will revolutionize your cooking game. Trust me, you won’t want to miss out on this buttery adventure.
Key Takeaways
- Butter powder is lower in calories and fat compared to regular butter, making it a healthier alternative.
- It contains essential vitamins and minerals like vitamin A and calcium, adding nutritional value to dishes.
- Butter powder has a longer shelf life, making it practical for storage and travel.
- It can easily be measured and incorporated into recipes without the need to soften or melt butter.
Benefits of Butter Powder
Butter powder is a convenient option for you if you’re looking for a long-lasting and easy-to-use alternative to traditional butter. It offers several nutritional advantages compared to regular butter.
First, butter powder is lower in calories and fat, making it a healthier choice for those watching their weight or cholesterol intake. Additionally, it contains essential vitamins and minerals, such as vitamin A and calcium, which are beneficial for overall health.
When compared to regular butter, butter powder also has a longer shelf life, making it a practical option for storage and travel. Its powdered form allows for easy measurement and incorporation into recipes, eliminating the need to soften or melt butter.
In the subsequent section, we will discuss the ingredients needed for making butter powder.
Ingredients Needed for Making Butter Powder
To create this powdered version, you’ll need a few key ingredients. Here are the ingredients you’ll need for making butter powder:
-
Unsalted butter: The main ingredient for making butter powder is unsalted butter. Make sure to use high-quality butter for the best results.
-
Nonfat milk powder: Nonfat milk powder is used to help dry out the butter and turn it into a powder form.
-
Flavorings: You can add flavor variations to your butter powder by incorporating herbs, spices, or even cheese powder for a savory twist.
-
Storage containers: Once your butter powder is ready, you’ll need proper storage options to keep it fresh. Airtight containers or vacuum-sealed bags are ideal for preserving the flavor and texture of the powder.
Now that you know the necessary ingredients, let’s move on to the step-by-step guide to making butter powder.
Step-by-Step Guide to Making Butter Powder
Now that you have all the necessary ingredients, let’s start by melting the unsalted butter. This step is crucial to create a smooth and creamy texture for the butter powder. Once the butter is melted, we will proceed with the next steps to make the butter powder. But before we dive into the process, let’s take a moment to explore the different types of butter powder available and the health benefits of using it in cooking.
Types of Butter Powder | Health Benefits |
---|---|
Salted Butter Powder | High in sodium, adds flavor to dishes |
Unsalted Butter Powder | Low in sodium, suitable for low-salt diets |
Organic Butter Powder | Made from organic dairy, free from pesticides and antibiotics |
Using butter powder in cooking offers numerous health benefits. Firstly, it provides the rich flavor of butter without the need for refrigeration or worrying about spoilage. Secondly, it is a convenient option for those who are lactose intolerant or following a vegan diet. Lastly, butter powder is a good source of healthy fats, vitamins A, D, E, and K, and essential fatty acids. Incorporating butter powder into your cooking can enhance the taste of your dishes while also providing nutritional value.
Tips and Tricks for Perfect Butter Powder
For the perfect butter powder, you’ll want to ensure that you use high-quality ingredients and store it in an airtight container to maintain its freshness. Here are some tips and tricks to help you achieve the best results:
- Storage options for butter powder:
- Airtight container: Use a container with a tight-fitting lid to keep moisture and air out, which can cause the powder to clump and lose its flavor.
- Cool, dark place: Store the container in a cool and dark pantry or cupboard to avoid exposure to light and heat, which can degrade the quality of the powder.
- Refrigeration: If you live in a hot and humid climate, consider storing your butter powder in the refrigerator to prolong its shelf life.
Comparing homemade butter powder to store-bought options:
- Quality control: Making your own butter powder allows you to have full control over the ingredients and ensures that you are using high-quality butter.
- Customization: Homemade butter powder allows you to add your own flavors and spices, giving you a unique and personalized product.
- Cost-effectiveness: Making your own butter powder can be a more economical option compared to buying pre-packaged versions.
Creative Ways to Use Butter Powder in Recipes
When incorporating butter powder into your recipes, you’ll discover a multitude of creative ways to enhance the flavors and textures of your dishes.
Butter powder is a versatile ingredient that can be used in various unique flavor combinations. For savory dishes, try adding butter powder to mashed potatoes, soups, or roasted vegetables to give them a rich and creamy taste.
In sweet recipes, incorporate butter powder into your cookie or cake batter for a buttery and indulgent flavor.
Additionally, butter powder can also be used in homemade beauty products. Mix it with other ingredients such as shea butter and essential oils to create a nourishing body butter or lip balm.
The possibilities are endless when it comes to incorporating butter powder into your culinary and beauty endeavors.
Frequently Asked Questions
How Long Does Butter Powder Last Once It Is Made?
Butter powder’s shelf life once made depends on storage recommendations. It can last for several months when stored in an airtight container in a cool, dry place. Proper storage is crucial for maintaining its quality and freshness.
Can I Use Margarine Instead of Butter to Make Butter Powder?
Using margarine as a substitute for butter in making butter powder may affect the flavor and texture. Butter powder offers the benefits of long shelf life and convenience, making it a versatile ingredient in various recipes.
Can I Add Flavorings or Seasonings to the Butter Powder?
Yes, you can add flavorings or seasonings to butter powder. It’s a great way to enhance the taste of your recipes. Some ideas include garlic powder, onion powder, or even herbs like thyme or rosemary. Experiment and find what works best for you.
How Does the Taste of Butter Powder Compare to Real Butter?
Butter powder has a similar taste to real butter, but it may lack some of the richness and depth. However, it still provides the convenience and versatility of real butter, making it a great option for various uses.
Can Butter Powder Be Used in Baking Recipes as a Substitute for Real Butter?
Yes, butter powder can be used in baking recipes as a substitute for real butter. It offers the benefits of convenience, extended shelf life, and easy measurement. Baking with butter powder yields similar results to using real butter.
Conclusion
In conclusion, making butter powder is a simple and convenient way to enjoy the delicious taste and benefits of butter in a powdered form. By following the step-by-step guide and using the right ingredients, anyone can create their own butter powder at home.
With its long shelf life and versatility in recipes, butter powder can be a valuable addition to any kitchen. So why not give it a try and experience the wonders of butter in a whole new way?
Can you imagine the endless possibilities of adding butter powder to your favorite dishes?
From sneaky childhood butter licks to penning some of our most popular articles, Jamie’s journey with butter has been lifelong. His culinary background gives him a unique perspective, allowing him to craft mouthwatering articles that educate and tantalize equally. Jamie’s travel adventures revolve around finding the world’s best buttery treats when he isn’t writing.
-
Butter Tips and Tricks3 months ago
2/3 Cup Butter Is How Many Tablespoons
-
Butter Tips and Tricks3 months ago
3/4 Cup Butter Is How Many Sticks
-
Recipes & Culinary Uses3 months ago
How Many Tablespoons in 3/4 Cup of Butter
-
Recipes & Culinary Uses3 months ago
How to Cook Dried Butter Beans
-
Butter Tips and Tricks3 months ago
How to Inject a Turkey With Butter
-
Recipes & Culinary Uses3 months ago
How Many Tbsp Butter in 2/3 Cup
-
Butter Tips and Tricks3 months ago
How Long Can You Use Butter After the Expiration Date
-
Butter Basics3 months ago
How to Inject Turkey With Butter