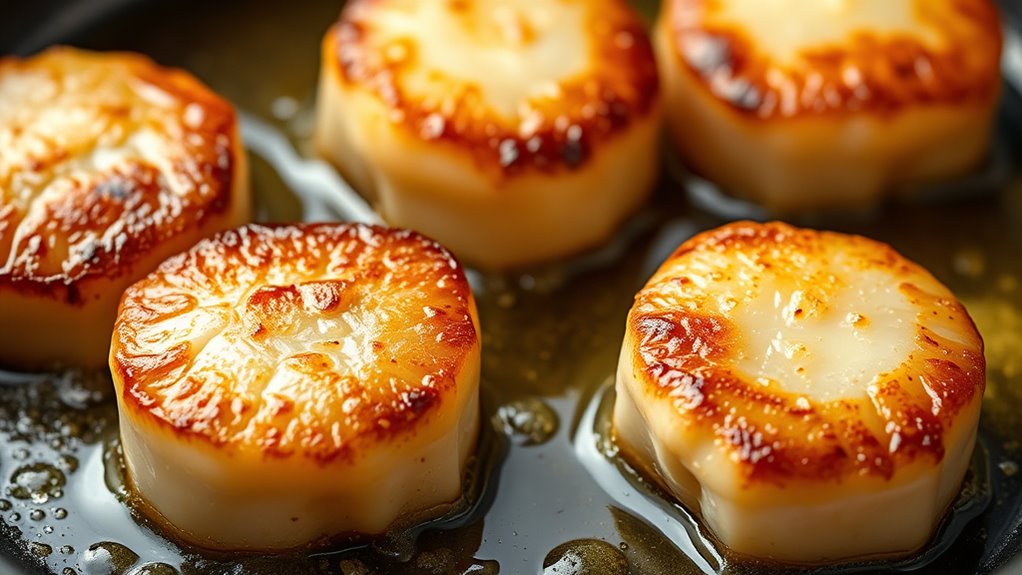
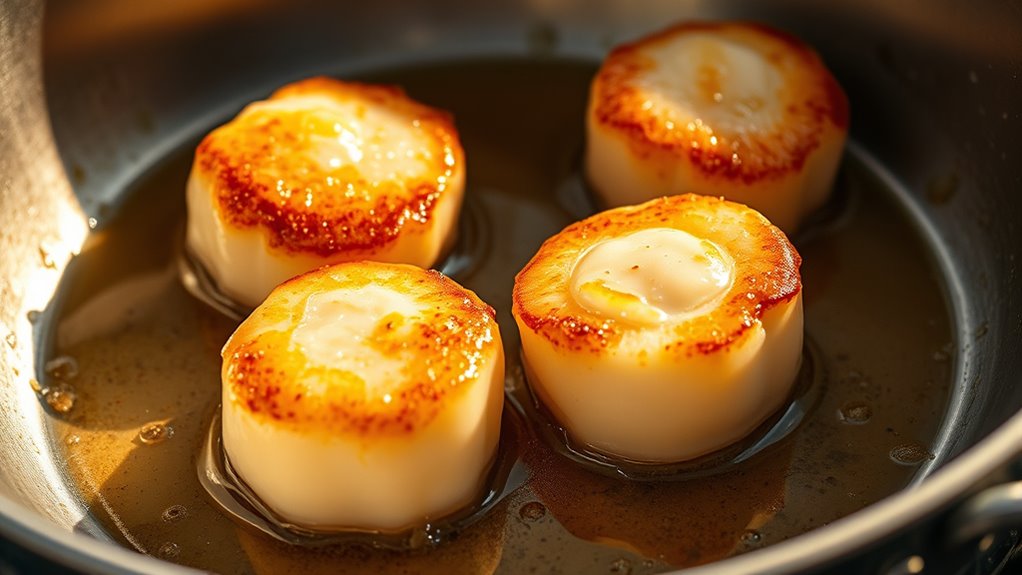
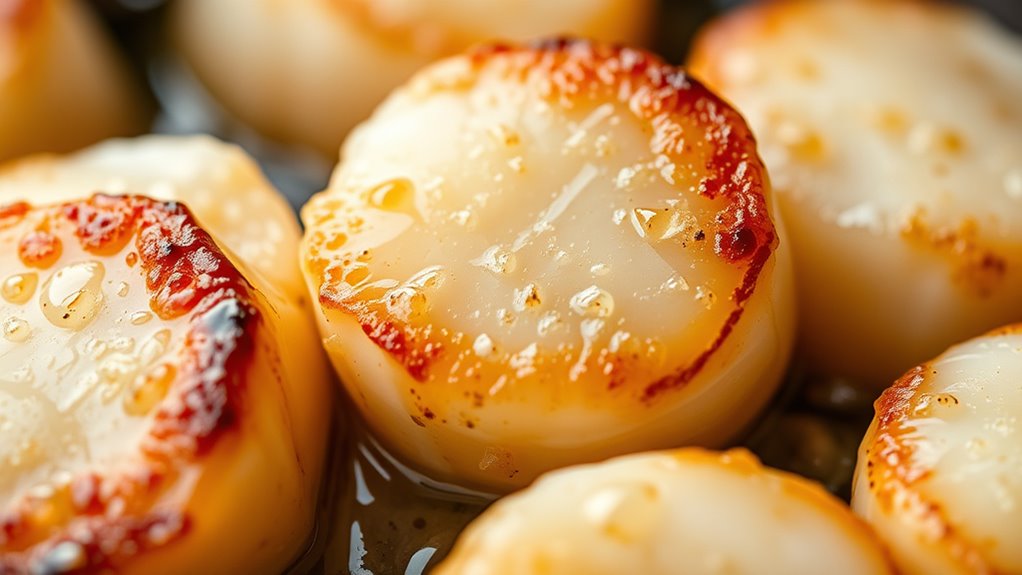
To achieve a Maillard reaction in under two minutes, start with dry, fresh scallops and preheat a heavy skillet over medium-high heat until just shy of smoking. Add a small amount of oil and then place the scallops in the hot pan. Pat them dry, sear for about 1.5–2 minutes per side, and spoon browned butter over them for extra flavor. Keep control of heat and moisture and you’ll master this quick, caramelized sear—longer techniques are just a step away.
Key Takeaways
- Use a preheated heavy skillet over medium-high heat for optimal Maillard reaction.
- Pat scallops dry thoroughly to ensure proper browning and prevent steaming.
- Add browned butter once the pan is hot, then place scallops carefully for quick searing.
- Sear each side for about 1.5–2 minutes until a golden crust forms.
- Maintain consistent heat to achieve rapid browning within 2 minutes without overcooking.

Peanut Butter Maker, Nut Butter Machine, 2025 New Electric Nut Butter Maker Machine, Electric Sesame Sauce Nut Grinder with Non-Slip Base Entry, Easy Install Easy to Use,Grinder
Our peanut nut grinder lets you easily grind a variety of nuts and seeds to make smooth.
As an affiliate, we earn on qualifying purchases.
Selecting and Preparing the Perfect Scallops

To guarantee your scallops turn out perfectly, start by choosing fresh, high-quality ones. Look for shellfish freshness: the scallops should smell clean and ocean-like, not fishy or sour. Fresh scallops will have a firm, plump texture and a slightly translucent appearance. Avoid any with a slimy surface or an off-putting odor, as these indicate spoilage. When preparing, pat them dry thoroughly with paper towels to remove excess moisture; this helps achieve a nice sear. Check the scallop texture—firm and springy, not mushy or rubbery. Proper selection and preparation ensure your scallops will cook evenly and develop a tender, juicy interior with a beautifully caramelized exterior. This careful process sets the foundation for a delicious brown-butter scallop dish. Paying attention to quality control and handling techniques will help you achieve optimal results every time.

1100W Peanut Butter Maker Machine, 33lbs/h Stainless Steel Food Electric Grain Grinder Sesame Sauce Grinder Nut Butter Maker Home/Commercial for Groundnut, Almond, Cashew Nut, Sesame, 2850RPM
【Industrial-Grade Durable Grain Mill】- Crafted with premium stainless steel housing & aluminum grinding bin for corrosion/rust resistance. Built...
As an affiliate, we earn on qualifying purchases.
Achieving the Ideal Brown Butter
Mastering the art of browning butter begins with patience and attentiveness. Start by choosing the right butter types—unsalted is best for control over salt levels, and grass-fed butter offers richer flavor. As you melt the butter, focus on heat control; too high, and you’ll burn it quickly, too low, and it won’t develop that golden-brown color. Keep the heat at medium, and stir constantly as the butter foams and begins to brown. Watch for a nutty aroma and tiny brown specks forming at the bottom of the pan. Once you see those signs, remove the butter from heat immediately to prevent burning. Perfectly browned butter will have a rich aroma, a golden hue, and a slightly nutty flavor, setting the stage for amazing scallops. Creating the perfect farmhousestyle setting can also enhance your overall cooking experience by providing a warm and inviting atmosphere.
Startbuymore Nut Butter Maker Machine For Peanats, Almonds, Cashews - Portable Electric Grinder With Smooth Consistency, Compact Kitchen Tool (Red)(US Rules)
[EFFICIENT NUT GRINDING] Transform your favorite nuts into a smooth consistency effortlessly, making delicious spreads like peanut butter.
As an affiliate, we earn on qualifying purchases.
Searing the Scallops to Perfection
Once your browned butter is ready, it’s time to bring the scallops to the pan. Use high-quality, fresh seafood sourced from reputable suppliers to guarantee peak flavor and texture. To sear perfectly, follow these steps:
- Pat the scallops dry thoroughly to promote even browning and prevent sticking.
- Apply your preferred marinating techniques—simple salt and pepper or a splash of citrus—allowing the flavors to penetrate briefly.
- Place the scallops in the hot pan, ensuring they don’t touch, and cook for about 1.5 to 2 minutes per side until a golden-brown crust forms.
- Monitoring these details ensures a crisp exterior while keeping the interior tender. Proper sourcing and preparation make all the difference in achieving searing perfection. Color accuracy is essential to assess the doneness visually and ensure a perfectly cooked scallop.

DBXMJWCMDT Electric Nut Grinder Peanut Butter Maker Machine, 500ml Large-Capacity Almond/Cashew/Sesame Grinding Mill with Non-Slip Base, Efficient Home & Commercial Nut Butter Processor
【Homemade Peanut Butter Maker】 This 500ml electric grinder allows you to create fresh, natural peanut butter and nut...
As an affiliate, we earn on qualifying purchases.
Timing and Temperature for Quick Results
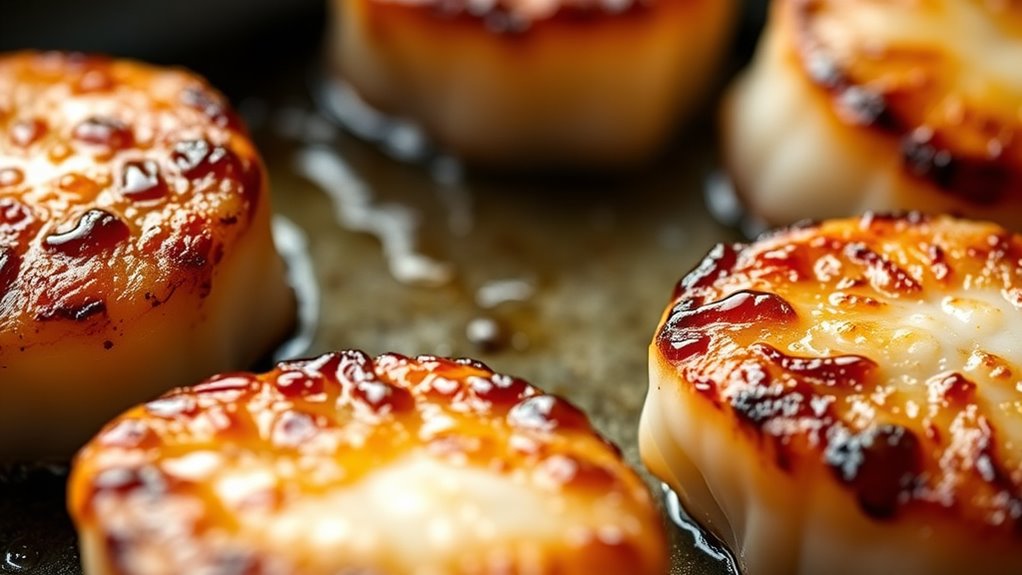
Achieving quick, perfectly seared scallops hinges on precise timing and temperature control. To get that ideal Maillard reaction in under two minutes, you need to manage cooking duration and heat control carefully. Start with a hot skillet—medium-high heat works best—and cook the scallops for about 1.5 to 2 minutes per side. Overcooking leads to rubbery texture, so watch for a golden-brown crust forming quickly. Use this table for reference:
| Heat Level | Cooking Duration | Result |
|---|---|---|
| Medium-High | 1.5-2 minutes | Perfect sear, tender inside |
| High | 2-2.5 minutes | Slightly darker crust |
| Medium | 3 minutes | Less crust, softer scallops |
Adjust heat as needed, and stay attentive to time for flawless results. Incorporating cooking techniques can further enhance your searing skills.
Enhancing Flavors With Simple Additions

To elevate the natural sweetness of seared scallops, adding simple ingredients like browned butter, fresh herbs, or a squeeze of lemon can make a significant difference. These small touches enhance flavor combinations and allow for ingredient substitutions based on your taste.
Enhance seared scallops with browned butter, fresh herbs, or a squeeze of lemon for vibrant, balanced flavor.
Consider these options:
- Herbs: Use parsley, thyme, or chives for fresh, vibrant notes.
- Acid: Lemon or lime juice brightens the dish and balances richness.
- Additional fats: Drizzle with olive oil or infused oils for depth.
Plating and Serving Your Gourmet Dish
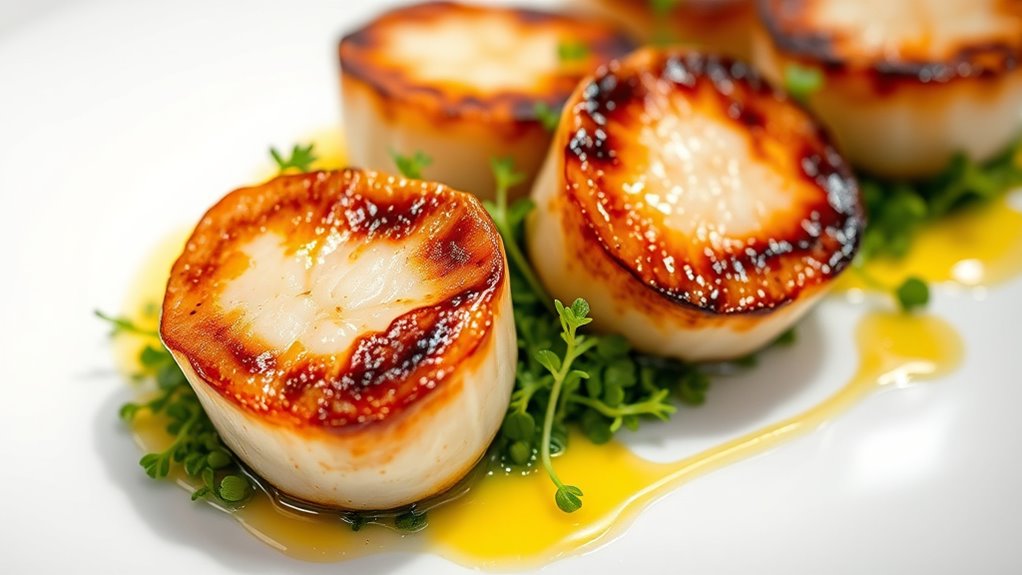
When plating your brown-butter scallops, focus on elegant arrangements that highlight their beauty. Garnish thoughtfully to add visual appeal without overwhelming the dish. Remember to serve at the right temperature to guarantee each bite remains flavorful and enjoyable. Using creative plating techniques can further elevate the presentation of your gourmet dish.
Elegant Plate Arrangements
Presenting your brown-butter scallops with an elegant plate arrangement elevates the dining experience and highlights the dish’s delicate flavors. Focus on plate symmetry to create visual balance, ensuring each element complements the others. Use color contrast to make the dish pop—pair the golden scallops with vibrant greens or bright citrus sauces. To refine your presentation:
- Arrange scallops in a circular or linear pattern for symmetry.
- Add contrasting elements, like colorful sauces or microgreens, near the scallops for visual intrigue.
- Use negative space intentionally to draw attention to the main components and avoid clutter.
This approach emphasizes sophistication, making your dish not only delicious but also a feast for the eyes. A well-thought-out arrangement transforms a simple meal into an elevated culinary experience.
Garnishing for Visual Appeal
Garnishing your brown-butter scallops enhances their visual appeal and adds a finishing touch that can elevate the entire presentation. Use color contrast by incorporating vibrant edible garnishes like microgreens, edible flowers, or a drizzle of bright sauce. These elements draw the eye and create a striking visual balance against the golden-brown scallops. Keep garnishes simple and intentional—avoid cluttering the plate. Fresh herbs such as chives or parsley add a pop of green, while citrus zest can provide both color and aroma. Edible garnishes not only make the dish more attractive but also complement the flavors. Remember, a thoughtfully garnished plate signals care and sophistication, enticing diners to savor the dish even before their first bite. Visual appeal plays a key role in elevating your culinary presentation.
Serving Temperature Tips
To guarantee your brown-butter scallops look their best and taste ideal, serving them at the right temperature is essential. Proper temperature control ensures they remain tender and flavorful, aligning with your guest preferences. First, serve the scallops immediately after cooking to preserve their moisture and Maillard crust. Second, aim for a temperature of about 125°F (52°C) to keep them warm without overcooking. Third, consider the dish’s accompaniments; if paired with a warm sauce, serve the scallops slightly cooler to prevent sogginess. Always monitor the serving environment to prevent rapid temperature loss. Adjust based on your guests’ preferences—some may prefer warmer or slightly cooler scallops. Mastering temperature control guarantees your dish impresses visually and tastefully at the perfect serving temperature. Proper temperature maintenance is also crucial to ensure the scallops stay tender and flavorful throughout your serving window.
Tips for Troubleshooting and Perfecting the Technique
To master brown-butter scallops, you need to get your technique just right. Make sure your pan heats properly before adding the scallops, and keep an eye on moisture levels to avoid steaming. Achieving a perfect sear depends on controlling these factors, so here are some tips to help you troubleshoot and refine your process. Proper heat management is essential for consistent results when searing scallops.
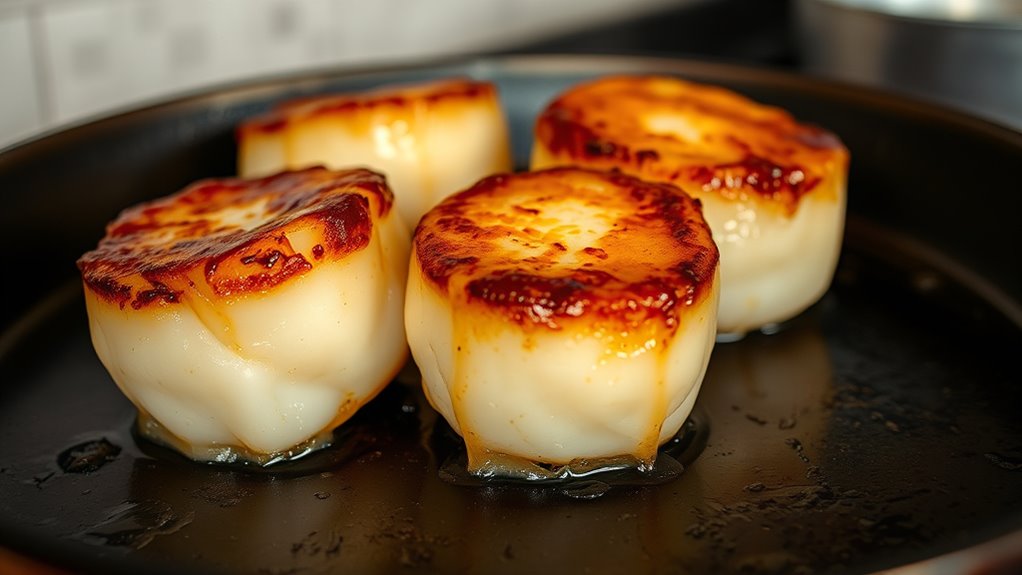
Proper Pan Preheating
Preheating your pan properly is essential for achieving a perfect sear on your scallops. The right pan temperature ensures a Maillard reaction, giving you that golden crust. Start by selecting the appropriate cookware—preferably a heavy-bottomed skillet like stainless steel or cast iron, which retains heat evenly.
To get it right:
- Heat your pan over medium-high heat until it’s just shy of smoking; this guarantees the correct pan temperature.
- Use a small amount of oil with a high smoke point, like canola or grapeseed oil, to prevent sticking.
- Wait about 1-2 minutes, then gently place your scallops. If they sizzle immediately, your pan is preheated correctly.
Managing Moisture Levels
Managing moisture is essential for achieving a perfect sear on your scallops; excess water can prevent browning and cause steaming instead of searing. To control moisture, pat your scallops dry thoroughly with paper towels before cooking. Moisture control starts with removing surface water to promote even evaporation and proper caramelization. During cooking, avoid overcrowding the pan, as it traps steam and hampers evaporation management. Keep the heat at medium-high to facilitate moisture evaporation quickly, ensuring the surface dries out enough for a crisp sear. If you notice excess moisture, briefly remove the scallops to drain, then return them to the pan once the surface is dry. Effective evaporation management prevents steaming and helps you achieve that beautiful Maillard crust every time. Additionally, utilizing remote hackathons can inspire creative culinary techniques and bring together diverse culinary talents to innovate new cooking methods.
Achieving Perfect Sear
Achieving a perfect sear on your scallops requires attention to detail and a few troubleshooting tips. First, ensure your pan is hot enough—this is essential for proper cooking techniques and developing that appealing Maillard reaction. Second, pat the scallops dry thoroughly; moisture prevents proper searing and affects flavor pairing. Third, don’t overcrowd the pan, which can lower the temperature and lead to steaming instead of searing. If you notice uneven browning, adjust the heat or give the scallops more space. Remember, a good sear enhances both texture and flavor pairing by creating a caramelized crust that complements the tender interior. Mastering these tips guarantees that your scallops achieve that perfect, restaurant-quality crust every time. Proper heat management is crucial for consistent results and a beautifully seared exterior.
Frequently Asked Questions
Can I Use Frozen Scallops for This Recipe?
Yes, you can use frozen scallops for this recipe, but keep in mind that thawing properly is key for flavor enhancement. Rinse them under cold water and pat dry thoroughly to remove excess moisture, which helps achieve a good sear. Frozen scallops work fine, but fresh ones often deliver a better flavor. Just make sure they’re completely dry before cooking to get that perfect Maillard reaction in under two minutes.
What Is the Best Type of Butter for Browning?
Imagine your pan as a stage where butter takes the spotlight. For browning, choose clarified butter or European-style butter with higher butter flavor and smooth butter texture. These butters melt evenly, develop a rich, golden crust, and add depth to your dish. Their concentrated flavor guarantees each scallop gets a luscious, toasted aroma. So, pick the right butter, and watch your scallops transform into a caramelized masterpiece in minutes.
How Do I Prevent Overcooking the Scallops?
To prevent overcooking scallops, pay close attention to cooking temperature and timing precision. Keep your heat medium-high, so they sear quickly without drying out. Cook each side for about 2-3 minutes, watching for a golden crust and opaque center. Remove them promptly once they reach the right doneness. Staying attentive and timing each step carefully helps you achieve perfectly cooked scallops every time.
Can I Prepare the Brown Butter in Advance?
Your kitchen will thank you if you prepare the brown butter in advance, saving you precious time and effort during cooking. Makeahead preparation not only streamlines your process but also enhances flavor as the butter develops deeper, richer notes overnight. Simply store it in a jar, reheat gently, and pour over your scallops. This way, you get perfectly caramelized flavor enhancement without the stress of last-minute multitasking.
What Wine Pairs Well With Brown-Butter Scallops?
For wine pairing, you want a wine that complements the rich, nutty flavor of the brown butter and the delicate scallops. A crisp Chardonnay enhances the buttery notes and adds a invigorating contrast. Alternatively, a light, slightly acidic Sauvignon Blanc can provide a lively flavor enhancement. These choices balance the dish’s richness, making each bite more enjoyable. Trust your palate to find the perfect match for your brown-butter scallops.
Conclusion
With your skillet shimmering and the aroma of browned butter filling the air, you’ve revealed the secret to perfect scallops in just minutes. As you plate your golden-brown gems, imagine each tender bite melting on your tongue, a warm, savory symphony of Maillard magic. You’ve transformed simple ingredients into a stunning, gourmet masterpiece—proof that with a keen eye and quick technique, you can turn everyday moments into culinary triumphs. Enjoy your delicious creation!